

Why Are Pond Liners Necessary?
You have a vision. For your backyard, your farm property, or for that parcel of woods out in the country that just begs for a fishing pond and a weekend campsite. Water features like ponds or small lakes can add aesthetic value, property value, and plenty of entertainment value and you’re ready to act on that inspiration. So, the very first practical question that occurs to you (or perhaps to your skeptical spouse) is: how do you make a pond out of dry land?
Perhaps once, perhaps a hundred times, most children grew up having the chance to play with a bucket of water and a bit of dirt, creating landscapes for tiny fantastical creatures that include tree-bark houses, mushroom-cap tables, and expansive lakes and rivers. While the tiny houses and tables may be there when the children return the next day, rivers and lakes are inevitably gone, soaked into the ground or dried up in the intense sunshine and summer’s heat. How will your pond’s fate be any different?
In truth, no natural lake is immune to water loss, whether from outflow into a river, evaporation, seepage, or usually a combination of those effects. The reason natural lakes persist is that the water that escapes is replenished more quickly by inflow from rivers and streams, precipitation or other surface runoff, and groundwater sources like natural spring.
When you’re constructing a pond, you’ll need to plan whether you want a seasonal feature that fills up only during the rainy season and gradually dries out the rest of the year, or if you want one that will support fish and plants that you can enjoy all the time. We’re going to assume that people reading this resource will opt for the latter. So, let’s talk about what that means.
Keeping water in place means that you want to eliminate, minimize, or control the ways it can escape. In the case of ponds, whether you’re considering a backyard koi pond or a remote fishing pond, that means preventing water from escaping by flowing to a lower spot in the surrounding land, or from simply seeping away into the ground. Evaporation can be another significant source of water loss, and there are ways to mitigate that process, but that’s not the focus of this particular resource. Deeper ponds and judicious use of shade can help get you started, though.
You can prevent water loss, from outflow, by siting your pond in a relatively low part of the terrain, or by building up walls or berms on the lower side. Again, this isn’t the focus of this e-book, but you may find some helpful information in BTL’s Learning Center. You may want to start off with a brief article on choosing the best location.
Water loss, through seepage, is one of the most persistent problems with constructed ponds and it can spell the death of an entire project if not carefully considered from the very start. Many people assume that if they have persistent drainage problems in a low point of their yard, that’s the perfect site for a pond, since “it’s full of water half the time anyway.” The key phrase here is “half the time.” You need a pond that holds water all the time. There are risks, too, from relying on surface water drainage to keep your water levels up—surface water runoff can contain chemicals and contaminants that may kill your fish or trigger unsightly, smelly algae blooms.
All things considered, your best bet with a constructed pond is to focus on preventing the water from seeping away through the soil. That’s where most ponds suffer, and it’s honestly the easiest option to fix if you consider which solutions best fit your needs.
Pretty much all backyard ponds these days are built with some sort of impermeable liner. There are many types of liners to choose from, ranging from natural clay to rigid preformed plastic shapes. We’ll be going into a lot more detail, but there are a host of additional benefits to consider when choosing your liner type.
High quality, durable liners can not only keep water in the pond where it belongs by preventing seepage. They can also:
- Help keep your fish healthy by maintaining water quality.
- Mitigate conditions which promote algae growth
- Minimize time and effort spent on maintenance
- Simplify the construction of adjoining streams and waterfalls
- Prevent chemicals like fertilizers and pesticides from leaching into your pond and injuring your fish and plants.
- Increase the longevity of your pond by minimizing the effects of weathering, erosion, and saturated soils.
- Prevent invasive plants or roots from spreading within the pond.
- Increase property value by showcasing an attractive, well-maintained pond.

So Many Kinds of Pond Liners
There are dozens of types of manmade ponds out there - some may be municipal or commercial water features installed for simple aesthetic appeal. Others ponds may be intended for local cooling effects when used in conjunction with a fountain or waterfall, while some are residential stormwater retention ponds, often outfitted with a fountain or two. Many botanical gardens have water garden sections, and museums devoted wetlands of all types can be found all over the world. Professional koi breeders, recreational fishing centers, and even businesses that offer wakeboarding and other watersports need ponds that are reliable, clean, and easy to maintain.
Then there are the rest of us - gardeners who want to create a haven of bog plants for pollinators and dragonflies, or urban enthusiasts who dream of a backyard pond full of colorful shubunkin goldfish.
For each of these purposes, there are a variety of liner options that can be employed to keep water in its place and to protect the pond and its denizens from harm. In most cases, pond liners can be categorized by the material used, which allows us to review the strengths and weaknesses of each choice, especially as they apply to the many types of ponds. Let’s dive in!
Concrete
The traditional material for swimming pools around the world, concrete can also be used to create an impermeable base for your pond. It’s strong, highly resistant to erosion, and may remain functional for up to 50 years. Thus, it will be a permanent feature of your yard, since it would take time and money to remove it. If you’re a new pond enthusiast, this is something to keep in mind. If you decide to sell your home, want a different size or shape, or there are design flaws in your original installation, a concrete-lined pond could become an expensive problem.
Concrete ponds should be professionally installed and cured to guarantee a high quality, long-lasting feature. This will increase both time and expense during startup, but custom details like complex inside contours can be included to accommodate shelves for plants, and sheltered spaces for fish to hide from predators or hot weather. Concrete ponds can be built as large and as deep as you like, and in pretty much whatever shape or even color you like. Although, since fish and plants may find the concrete surface to be too rough, you may ultimately have to cover it with a second pond liner for their protection. That would increase your costs further and certainly eliminate the advantage of custom colors.
Two other factors should also be considered. First, concrete is a naturally porous material, meaning it’s riddled with tiny, microscopic holes or crevices that allow liquids and air to penetrate it. These holes and crevices are surfaces where algae can easily build up, and once established, it can never be completely eliminated. While some microscopic algae is necessary in a healthy pond, many pond owners object to the greenish tint of algae-covered walls. If you prefer pristine white or bright colored walls, expect to be faced with tedious scrubbing sessions to keep emerging algae under control.
Finally, due to the chemical makeup of concrete, these ponds will typically have higher pH levels (more alkaline) during the first 3-5 years as the material continues to cure. For an experienced pond owner, this can be managed with careful chemical balancing and judicious use of additives, but a novice may be more comfortable consulting with a pond expert until they get the hang of things.
Preformed pond liners
Preformed liners are generally non-flexible and are available to purchase in relatively few predetermined shapes and sizes. Since these characteristics are set during manufacturing, it’s not possible to change them and it can be quite difficult to make even minor adaptations. This marks one of the primary disadvantages of preformed pond liners: once purchased, your pond design is set in stone. Anything from minor adjustments or expansions to wholesale redesigns, all require purchasing and installing an entirely new liner.
Preformed pond liners are typically made from either molded fiberglass or plastic. For square, circular or rectangular ponds (often used in modern or formal designs), box-welded liners can be custom fabricated from flexible geomembranes.

Plastic
The average lifespan of a preformed plastic pond liner is ten years. A few may make it to the 15-year mark, but many won’t even last 10 years. Plastic liners exposed to sunlight become weak and brittle over time and are vulnerable to cracking. When a rigid plastic pond liner fails, not only must the original liner be torn out, but the process of installing a new liner is just as much work as starting from scratch.
Rigid pond liners have a shorter lifespan than flexible options largely due to imperceptible (to us) ground movement. This movement may be due to ground settling, nearby disturbances to the soil or the water table, frost movement, and yes, minor earthquakes. As the plastic ages and becomes brittle, even minor ground movement can cause cracking and serious, irreparable leaks.
Installation of a plastic pond liner sounds simple - dig a hole and drop it in, right? Yet, as in many things in life, the reality is much more complex. While these liners are stiff, they’re not particularly strong, and it’s imperative to evenly support every inch of the plastic shape to prevent warping and eventual cracking. A correct installation involves covering the bottom of the hole with a generous layer of sand before the form is placed, then filling in gaps between the soil and the liner with sand at the same time it’s filled with water. The added weight of the water helps eliminate gaps and prevents shifting during installation. The pond form must also be meticulously leveled as the hole is backfilled. This process takes time and careful attention to detail.
Another frequent issue with preformed plastic or fiberglass liners is their limited size and depth. Transportation becomes quite expensive proportional to the number of units in a single shipment, so large and deep pond forms quickly become unprofitable for manufacturers. In fact, most preformed liners have a maximum depth of 18-24 inches. Such shallow ponds may work quite well for a garden pond that will feature only a variety of plants, but it usually won’t support a healthy fish population. Shallow ponds not only lose a lot of water due to evaporation, but the water quickly warms up (and cools down) as the outside air temperature changes. Without the ability to seek deeper areas to escape temperature extremes, cold water animals like fish rapidly become stressed and may even die in the span of a single hot day. Shallow ponds also leave their occupants vulnerable to predation from wildlife. Birds, raccoons, and even domestic cats can easily see and reach to the bottom of the pond, and the fish literally have nowhere to hide. Not much is more discouraging to find that your lovingly installed pond has been completely decimated in just a few hours.
Fiberglass
Fiberglass, as a material, is quite rigid, making preformed fiberglass liners strong enough that they can be placed directly on top of the ground and filled with water - no digging required. Landscaping or a decorative enclosure can be added for an attractive appearance, and fiberglass is quite durable so it can be expected to last for up to 30 years, even full exposed. Preformed fiberglass shells are still somewhat limited in depth and shape, and factory customization is all but impossible, unless you’re prepared for premium pricing.
Nowadays, some newer fiberglass liner types can be customized, so they don’t actually fall under the classification of “preformed”. In these cases, the liner is installed as a flexible matting that can be molded to any shape to match the contours of the hole. Once placed, the matting is hardened and made waterproof by applying resins. The resin coating has a smooth texture that doesn’t allow algae to stick and is available in a multitude of colors. However, it’s important to remember that only some resins are approved as safe for fish and wildlife and the cost of professional custom installation can be significant.
Because fiberglass liners are generally much more expensive, this option is usually best suited for highly dedicated pond owners, or commercial shops needing a feature that can be quickly set up above ground and emptied and moved between seasons.
Box Welded
Box welded liners are made from flexible geomembranes and custom fabricated in the factory to exact dimensions. The liner material is heat welded to melt multiple layers together, forming a regular shape like a square or rectangle. Some fabricators also offer circles, but box welding isn’t suitable for irregular shapes and lines. Box welded liners arrive folded up and since it’s a relatively simple matter to unfold them and simply drop them into the prepared hole and anchor the flaps, installation is simple.
Since the material itself is flexible, these liners are much less prone to cracking, and some high-quality materials are even rated for storing drinking water - an absolute assurance that they’re safe for your fish and plants. BTL Liners offers box welded liners fabricated from the AquaArmor line of reinforced polyethylene materials. Give us a call and we’ll help you set up your order!
Box welded liners are much less expensive than fiberglass, but more expensive than rigid plastic liners. Their lifespan is also in between the extremes, but they share similar restrictions as far as shape goes. If your landscaping plan allows for very formal rectangles, this might be a good option for you, but those seeking a more natural look probably won’t be satisfied.
Flexible Pond Liners
Flexible pond liners are on the affordable end of the scale and are well adapted to irregular and unique pond shapes, as well as underwater shelves and depth changes. Flexible liners are relatively easy to install and even large ponds can be fully lined in a single day. Even better, flexible liners are easy to customize and make changes to, even after the liner has been in use. No other type of liner is suited as well to expanding your pond, adding a waterfall, or even changing the shape without needing to dig up and replace the entire pond.
The important thing to know is that the term “flexible geomembrane liner” encompasses a variety of materials, whose chemical makeup and physical characteristics vary quite a bit. If you’re leaning towards a flexible pond liner, look at our section Much Ado About Flexible Materials, where we talk in depth about the strengths and weaknesses of a variety of different types of flexible pond liners, including EPDM and RPE.
Natural Clay Liners
Some environmentally conscious pond enthusiasts prefer to use liners made entirely of natural materials, and this means clay. Clay liners mimic the way ponds and lakes form in nature.
Clay, or bentonite, liners must be custom installed, and the process can be demanding. It involves applying two or more layers of material which must be carefully compacted to eliminate air pockets in order to create a durable, watertight seal. Limestone and clay layers are the most practical for small pond owners since compacted clay alone must be very thick to achieve a durable watertight seal.
Usually, a clay and limestone liner (often called lime concrete) begins with covering the walls and floor of the excavation with a layer of limestone, which is in turn covered with a layer of bentonite clay. When applied correctly, this combination is waterproof and is also fairly durable, but it is still vulnerable to erosion. Clay liners must also remain moist in order to maintain their integrity. Once clay dries out, it shrinks and cracks, and even if it’s wetted again, the cracked clay will no longer seal, making it very difficult or even impossible to repair.
If you must drain your pond for any length of time (even for as little as a few hours in hot, dry weather), care must be taken to keep the exposed liner moist. You can do this by covering the exposed clay with a good layer of mulch or straw.
Overall, clay liners require more upkeep than most, but when properly cared for they can last for years. On the aesthetics side, due to the nature of clay, some amount of persistent silt and debris in the pond bottom, or possibly even suspended in the water column should be expected. This can be a good option for pond owners seeking a very natural look, but if crystal clear water is your goal, you’re not likely to get it with clay.
Cheap Alternatives to Liners:
As we’ve seen, many impermeable materials are available as pond liners, and while many are relatively inexpensive, some budget-minded enthusiasts may opt to cut corners even further by using or reusing tarps, deflated pools or waterbeds, or roofing membranes. Unfortunately, these are usually questionable choices, with some releasing toxins into the water, and others prone to rapid degradation from sun exposure or troublesome leaks from poorly sealed layers.

What are All These Layers?
Today, flexible geomembranes, as a class, are thin, continuous sheets of synthetic polymers, usually referred to simply as plastic. Specific geomembrane materials may be derived from different types of polyethylene, polyvinyl chloride, or a combination of materials. The ultimate characteristics of a polymeric membrane are determined by the types and structures of the polymers, i.e., branched chains, which produce a product which is slightly denser and stiffer, such as HDPE, and short chains, which produce a product which is slightly more elastic, such as LDPE. The specific molecular structures are selected for by adapting the manufacturing process using heat, pressure, and a variety of additives.
Engineered Coatings
How Coatings are Used
A simple HDPE or LDPE membrane has its own unique characteristics, but sometimes even then, the material isn’t an ideal fit for a specific application. In these cases, it may be that combining two different materials would allow them to share properties, and the end product may reflect the desired characteristics while eliminating or reducing the undesired ones. In pursuit of these combinations, scientists have developed ways to merge two (or more) polymer materials to produce a geomembrane that is, ultimately, better than the sum of its parts.
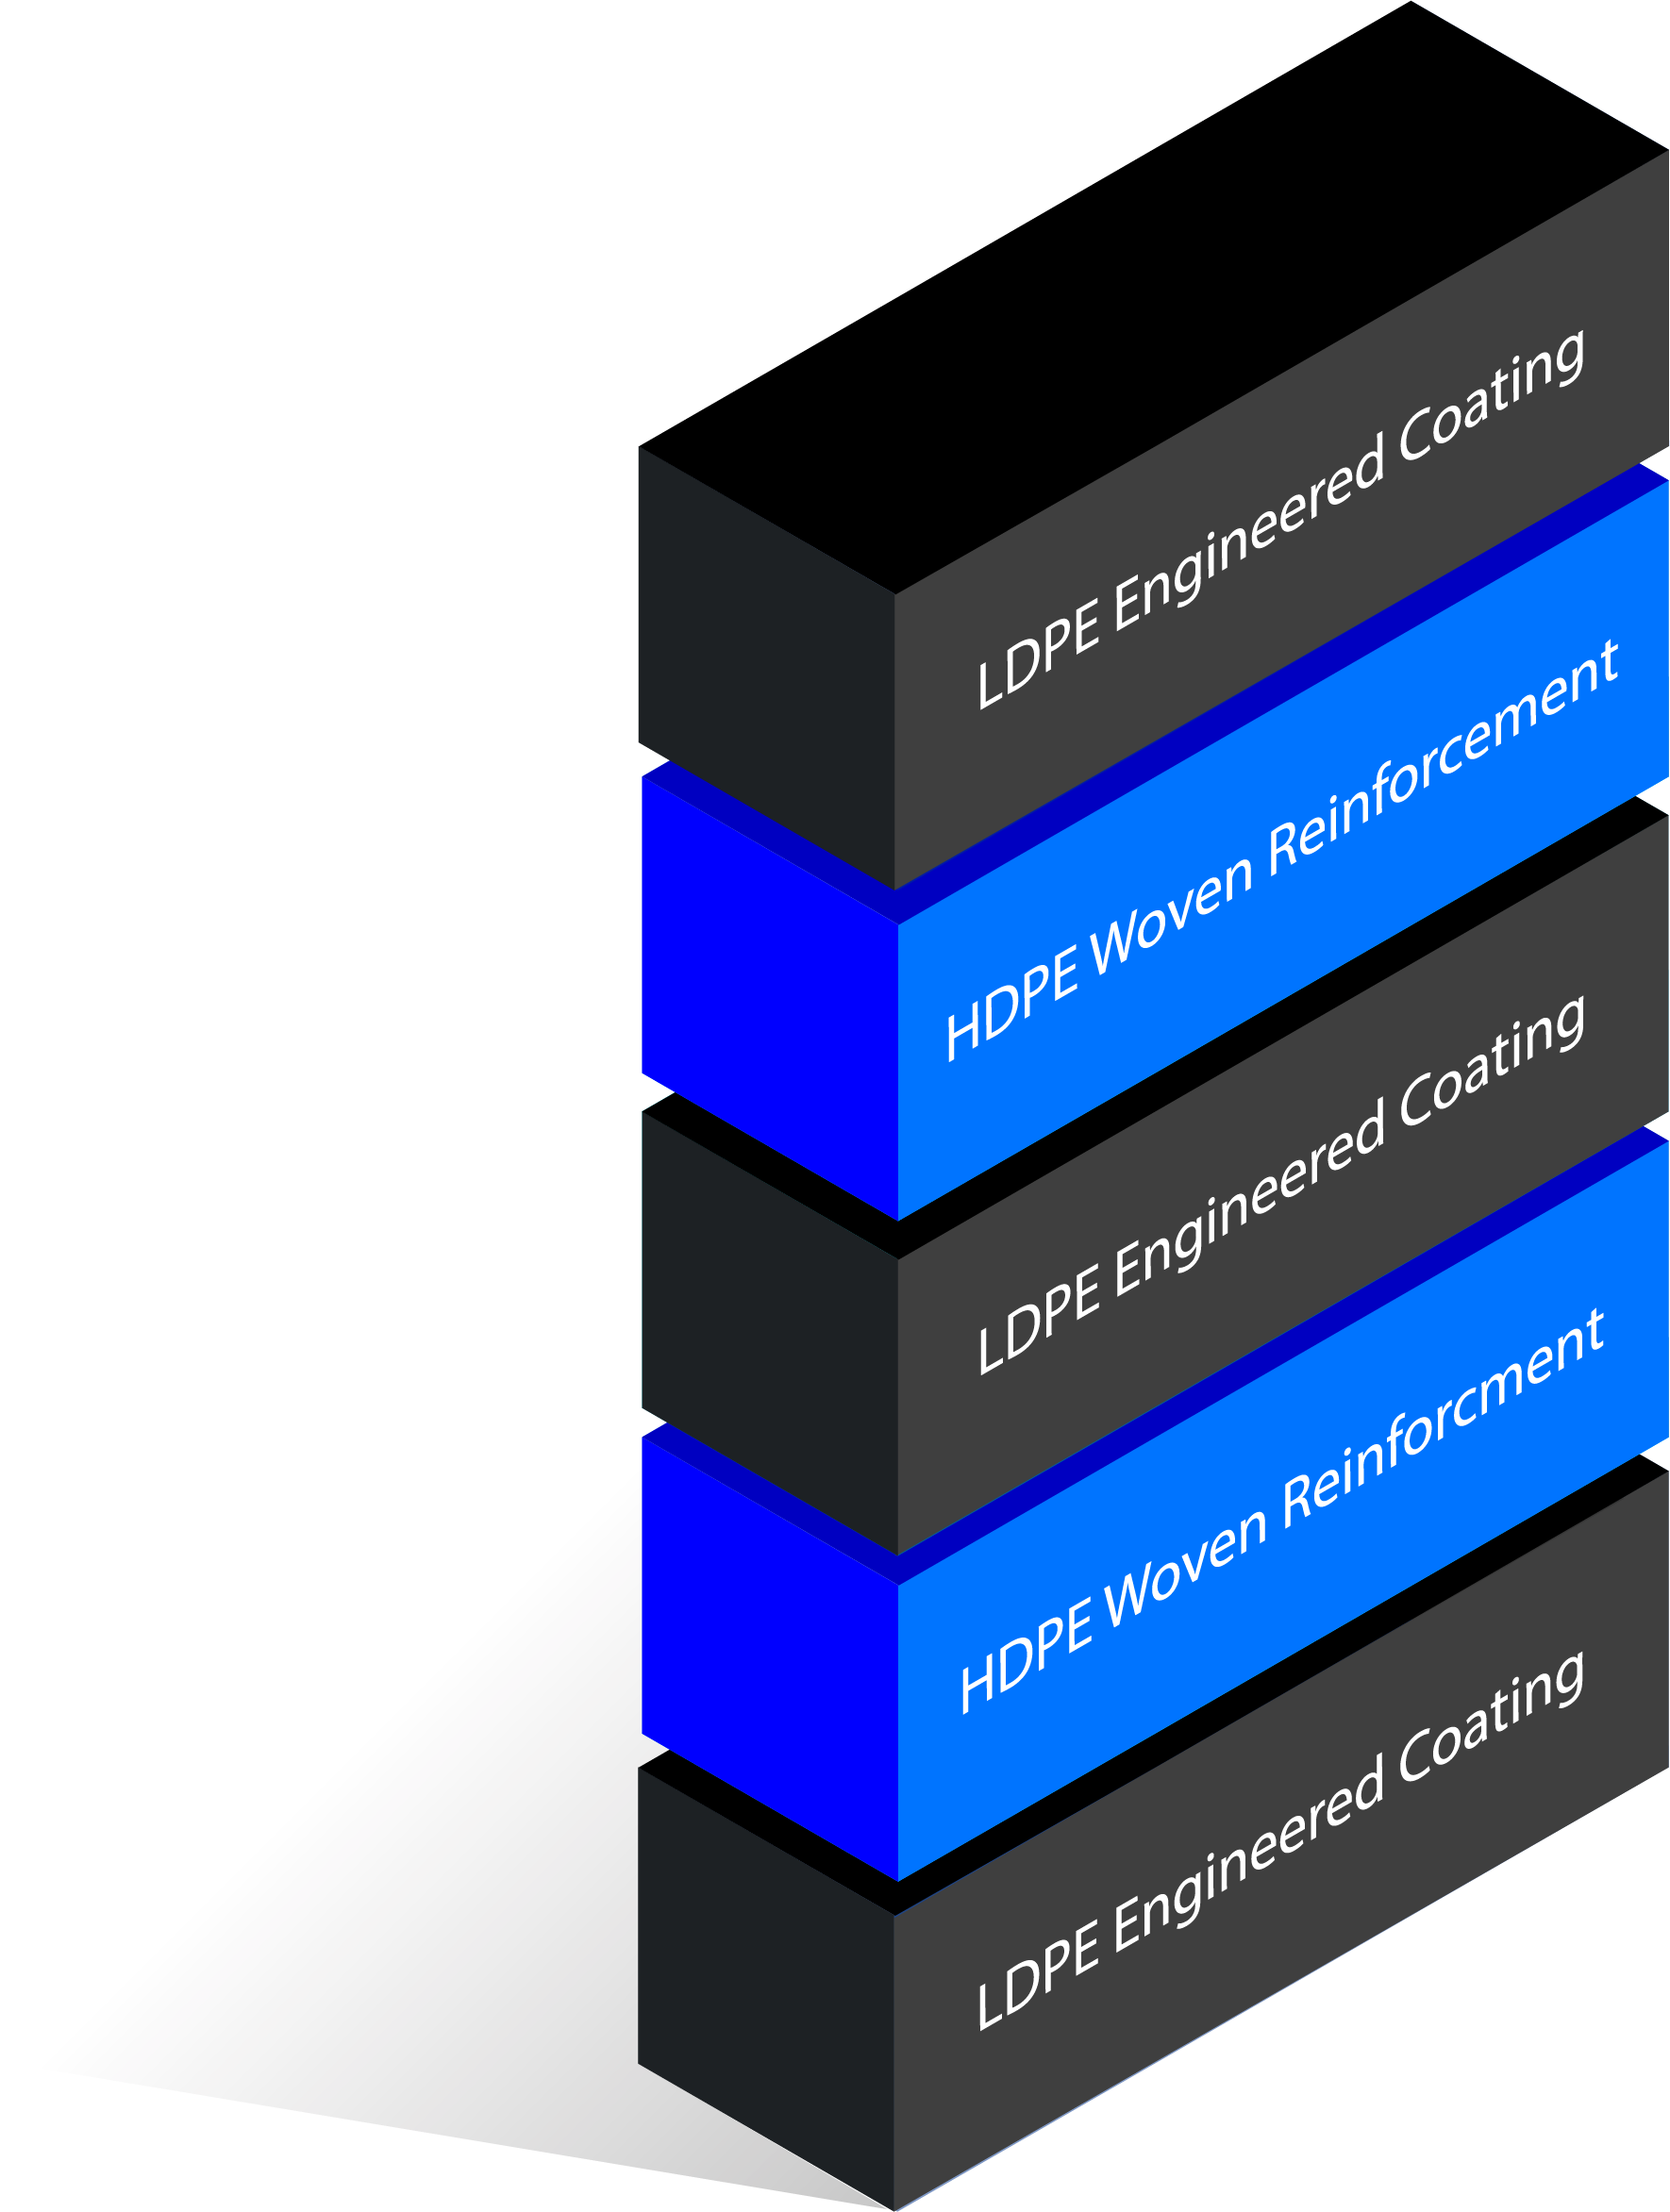
Today, an increasing number of high-quality pond liners are manufactured by starting with a base material, or scrim, which offers strength and tear resistance, which is then encapsulated with engineered coatings that contribute other qualities such as impermeability, flexibility, puncture resistance, and UV resistance.
Reinforced Polyethylene (RPE) liners are typically constructed of layers of HDPE and LDPE. They’ve been around for years, and are widely recognized for their outstanding strength, durability, UV and chemical resistance, and more recently, for their affordable price.
PVC membranes have recently been introduced with new coatings that increase their lifespan and eliminate longstanding concerns with the use of liquid plasticizers. However, this new material is both expensive and highly specialized, best suited for use in hazardous material containment and other chemically challenging applications.
EPDM pond liners are single ply membranes and are not offered with coatings.
How Coatings are Applied
Engineered coatings are added to geomembranes during the manufacturing process, and the method varies according to the materials and the membrane’s ultimate application. Some coatings are sprayed on, some are fused through calendaring, and others are co-extruded as a single sheet.
All BTL AquaArmor geomembranes are co-extruded. They’re produced by sandwiching one or more reinforcing layers, or scrims, between layers of LDPE. This “sandwich” is passed through a series of rollers, which apply heat and pressure to melt the LDPE and permanently bond it to the scrim. Since the layers merge into each other in a molten state, they are permanently joined and cannot delaminate. The final product is a strong and durable geomembrane with excellent resistance to punctures, tears, and UV radiation.
Scrims / Woven Reinforcement
In reinforced polyethylene geomembranes, the choice of scrim material affects the characteristics of the final product. BTL uses a woven HDPE layer in nearly all AquaArmor products. This HDPE scrim is tightly woven with no gaps between the individual tapes. Our PP-45 product, however, uses a woven polyester scrim. Polyester scrims are not tightly woven, and spaces are visible between each “thread.”
Both scrim choices produce excellent geomembranes, with slightly differing qualities. The correct choice for your application depends on which characteristics are most important to you.
Geomembranes using woven HDPE for the reinforcing layer are less expensive than other geomembranes. Since HDPE has inherent resistance to UV exposure, it won’t deteriorate as quickly when exposed to sunlight. However, HDPE is relatively stiff compared to other polyethylenes, which can make it slightly more difficult to install in some situations.
Geomembranes that use woven polyester for the reinforcing material are inherently more flexible and have superior tear resistance, making them a better option in situations where high strength is particularly important. However, polyester is more vulnerable to UV exposure and in some cases can deteriorate more rapidly.
UV Resistance
Why is the Sun a Problem?

Pond liners are often exposed to sunlight, even with carefully constructed borders. When a pond’s water levels drop due to evaporation, the top of the liner can peek out above the waterline where the sun can reach it. In other cases, maintenance or repair activities may require lowering water levels by a significant amount. Brief UV exposure doesn’t seem likely to destroy most pond liners, but once damage occurs, it’s progressive. If you’re hoping for a pond that will last for years, any type of damage will inevitably shorten the liner’s lifespan. If you’re building an irrigation pond which could be at least partially empty for several months out of the year, for example, UV resistance is absolutely a critical factor in your choice of material.
Unfortunately, there is a lot of unclear and sometimes conflicting information on the internet regarding UV resistance of different materials; even from manufacturers themselves. HDPE, LDPE and LLDPE can be described as the best or the worst in UV resistance, depending on which resource you check. We’ll try to clear up some of the confusion here.
Molecular Structure
When comparing HDPE, LDPE, and LLDPE in their most basic forms, LLDPE (linear low density polyethylene) is considered to be the most resistant to UV damage. The resistance is derived from its molecular structure, which contains a high proportion of relatively short linear polymer chains, which are very stable and less susceptible to disruption from UV rays. LLDPE is also denser than LDPE and has a higher tensile strength, which allows it to maintain an acceptable level of performance even if some of the polymer chains are damaged.
In terms of UV resistance, HDPE falls somewhere in the middle. Instead of long linear chains, HDPE is made of large branching structures of polymers. These branches form a dense, compact structure, making the material less vulnerable to UV radiation, as well as stronger and stiffer, but ultimately the branching structure is not quite as stable as long chains.
Among these 3 types of polyethylenes, LDPE is considered the least resistant to UV degradation. LDPE has a comparatively open molecular structure, as well as a low molecular weight, which allows UV rays to penetrate the material more easily. UV light can break down the long polymer chains, eventually producing a material that’s weak and brittle.
How does UV light do so much damage? Within the spectrum of energy emitted by the sun, the short wavelengths of ultraviolet light have higher photon energy compared to other wavelengths. When absorbed by polyethylenes, if the photonic energy is greater than the molecular energy that holds the chains together, the molecular bonds will split, a process known as oxidative degeneration. As the bonds break down and release free radicals, a train of destruction begins which continues to spread, even absent further exposure to UV rays. This process leads to a steady decline in physical strength, flexibility, and durability, inevitably reducing the useful lifespan of the material.
UV Stabilizers
So, you may wonder, how can BTL and polyethylene manufacturers offer UV warranties for liners that are exposed to sunlight? UV stabilizers are the answer. The fact is, geomembranes for pond liners are nearly always manufactured with the addition of carbon black, a highly rated UV stabilizer. In action, carbon black absorbs both visible and UV rays and transforms them into less harmful thermal energy. This stability can last for decades, making UV warranties possible, even for applications where the material is constantly exposed to sunlight.
Carbon black is typically added to polyethylenes in concentrations of 1%, 2%, or 3%. (After 3%, the UV protection tapers off.) All BTL-designated single-scrim geomembranes in the AquaArmor Line contain a minimum of 3% carbon black for maximum protection, while the RPEL-30 geomembrane, in addition to carbon black, includes a clear LLDPE film coating which provides even more robust protection. Our thicker double-scrim products, on the other hand, reap the benefits of their multi-layer construction.
Our BTL, PPL, RPEL, and PP Lines
 (Layering for: AquaArmor BTL-20 - BTL's single scrim products are thin, lightweight, very flexible, and offer warranties against UV damage even in exposed conditions.)
 (Layering for: AquaArmor PPL-24 - BTL's double scrim products are built with durability and longevity in mind. These liners are moderately thick, offering exceptional durability against punctures, tears, and abrasion. The double scrim reinforcement conveys excellent UV protection, and each product offers a 20-year warranty against UV damage, even in exposed conditions.)
 (BTL’s RPEL-30 product is a relatively thin, single scrim product enhanced by an additional layer of highly UV resistant LLDPE. This film offers great stability against UV damage, even in exposed conditions, while maintaining the exceptional flexibility and light weight of our thinner products. This is an exceptional value for agricultural irrigation ponds where water levels may fluctuate significantly from season to season. This product is also well suited for many hydroponic and aquaponic applications due to its superior hydrostatic resistance. )
 (BTL’s PP-45 product is unique among the AquaArmor line in that it uses a woven polyester scrim and one side of the material is tan rather than black.)
Much Ado About Flexible Materials

What is a mil?
You’ll find a surprising number of pond liner websites that refer to the thickness of their pond liners in units of millimeters. This is a surprising mistake, because mm and mil are vastly different sizes! To understand why this is such an important distinction, let’s start with a simple conversion: 1mm = 39.4 mils. Or, 1 mil = 0.03 mm.
For our US customers, 1 mil is 0.001 inches (one thousandth of an inch). Another way to visualize it is that ⅛ inch (about 3mm) is equal to 125 mils. 125 mils is more than twice as thick as the strongest liner we sell.
Let’s consider some comparisons:
30 mils is a popular thickness for most RPE pond liners - it’s reasonably strong and yet lightweight and flexible, ideal for most backyard ponds. For reference, it’s about the thickness of a credit card.
Some websites will quote this as 30mm, which should set off alarm bells in your head! Imagine trying to install a liner that’s over an inch thick!
The thickest liner we sell, suitable for the most challenging applications that require high strength, durability, and long lifespan, is 60 mils. For reference, that’s about the thickness of a penny. 60mm, on the other hand, converts to over 2000 mils, and is approximately the size of a skateboard wheel.
Keep these differences in mind as you consider different liner sources. (Nobody actually offers 60 mm thick polyethylene pond liners.)
Through Thick and Thin
In any sheet material you consider, thickness is directly related to the product’s strength and toughness, whether you’re looking at a paper towel, aluminum foil, or a painter’s tarp. The same is true for geomembranes, and since these materials are used in a wide variety of applications with differing demands, they’re available in a range of thicknesses.
While the choice of material and construction of a given geomembrane has an even greater effect on the final qualities of the material, it’s reasonable to consider early on what your needs are in relation to thickness.
Geomembrane pond liners start at about 18-20 mils thick and typically top out at about 60 mils for all but the most extreme applications. In general, when you’re looking at the same material composition, the thinner examples will be lighter and more flexible, but won’t be as durable as their thicker counterparts. A thicker liner will naturally be more resistant to punctures and tears, and even UV radiation.
Keep in mind, though, that the material is ultimately the most important determiner of durability. A 45 mil EPDM liner is considerably thicker than an RPE liner that offers similar strength, tear resistance, and durability.
HDPE
Single ply HDPE geomembranes have historically made popular pond liners because of their low price, strength, and resistance to tears, along with the ability to heat weld multiple sheets for extremely strong, leak-free seams. However, HDPE on its own is relatively stiff and heavy, and can be expensive to ship and difficult to install. It’s also vulnerable to punctures and damage over time from scuffs and superficial scratches.
Today, HDPE geomembranes are more commonly used for chemical containment and landfills than fishponds, because of their excellent chemical resistance. There are other inexpensive options that are better suited to the specific needs of most fishponds.
LLDPE
Even though HDPE and LLDPE are both polyethylene plastics, they have different molecular structures, giving them different physical properties. It’s important to keep these differences in mind because these properties will ultimately determine how well a liner meets your needs.
Compared to HDPE, LLDPE is much more flexible and can be stretched and folded easily to conform to your pond’s shape, making it easier to install with fewer wrinkles. Because of its softness, LLDPE can be folded without damage, making it easier to package and ship, even in extremely large panels.
Pricewise, LLDPE is generally comparable to HDPE, but it also offers higher UV resistance than its HDPE counterpart. Look at our discussion of UV Resistance for more details on how that works.
LDPE
LDPE represents a kind of middle ground between HDPE and LLDPE for most of the characteristics we’re concerned with, including flexibility and strength, although LDPE can’t withstand elongation (lengthwise stretching) as well as LLDPE.
For UV resistance, however, plain LDPE comes out on the bottom of the stack, since it is a clear or translucent material and therefore unable to deflect or absorb the energy from UV rays. However, the addition of carbon black contributes significantly to its durability, and some manufacturers will rate LDPE much higher on the UV resistance scale based on the addition of these stabilizers. For more information about carbon black, check out our discussion of UV stabilizers.
RPE (Reinforced Polyethylene)
Because RPE has become such a popular pond liner material, merchants sometimes refer to it simply as HDPE (see above for information on unreinforced HDPE liners). Here at BTL Liners, however, we usually refer to our AquaArmor line of pond liners as RPE (Reinforced Polyethylene) geomembranes. Compared to single polymer materials such as HDPE, LDPE, and LLDPE, RPE is composed of several types of polyethylene. Those specific types may differ from product to product, but each layer contributes a key property that improves the final product’s overall performance.
The reinforcing layer in our AquaArmor RPE liners is a scrim of tightly woven, prestressed HDPE tapes. During manufacturing, this scrim is co-extruded with layers of LDPE resins on both sides. The process of co-extrusion combines materials together to form a single film structure which, in this case, makes the liner impervious to water, and increases flexibility. The HDPE scrim makes the product extremely strong and resistant to both tears and punctures. LLDPE layers convey exceptional UV resistance.
Now that it’s been around for a few decades, RPE has gained an excellent reputation for strength, durability, and ease of use. Nowadays, it’s considered to be one of the best, most affordable choices among flexible pond liners. The combination of a tightly woven HDPE reinforcing core and impermeable LDPE coatings gives the liner exceptional puncture resistance - better than single layer HDPE, EPDM or PVC liners, even though the material is half as thick and one third the weight. As a bonus, RPE’s exceptional strength and durability means that underlayment is not required, a significant savings over EPDM and other more vulnerable materials. Combined with carbon black, RPE offers excellent resistance to UV radiation.
BTL’s RPE liners are lightweight and flexible, making them easy to ship and install. They conform well to complex pond shapes, without risk of deforming, and can be fabricated in extremely large sheets. The ability to order extremely large sheets allows you to cover all but the largest ponds with a single panel, reducing your risk of imperfect seams to zero. Since RPE is thermoplastic, seams and joints that must be done on-site can be handled with a heat gun, which creates a permanent weld that’s stronger and more stable than adhesives and liner tapes used for other materials.
RPE has a very high strength-to-weight ratio, making it extremely resistant to tears and scuffs. Excellent dimensional stability means the pond liner will retain its shape even when exposed to extreme temperatures, stretching, or other stresses. In fact, when properly installed and maintained, a quality RPE liner can last upwards of 40 years.
One exceptional example is our proprietary PPL™-24 product, a 24 mil RPE with a 5-layer construction; triple layers of LDPE coatings sandwich two layers of HDPE woven scrim. This robust construction results in an extremely puncture and tear resistant, yet lightweight liner material. BTL originated and developed the PPL™ line and is the nation's sole source for this product.
EPDM
EPDM (ethylene propylene diene monomer) is a synthetic rubber that has long been one of the most popular flexible geomembrane pond liners, despite its comparatively high price. Because it’s a soft, extremely flexible material, it folds easily around corners without losing strength and works well with irregular pond shapes, although it’s not generally the best option if your design includes tight corners. In comparison to other materials like PVC, EPDM is very tolerant of cold and won’t lose its flexibility or develop cracks even during extreme winter conditions, making it a good candidate in the Upper Midwest and other regions where extreme arctic blasts are possible. EPDM is only moderately puncture resistant, so it requires an underlayment, which is an added expense, but it has good endurance against UV rays, ozone, and other weathering effects. BTL’s AquaProFlex EPDM pond liners are also certified as fish and plant safe.
To offer the best performance, EPDM geomembranes are generally thicker than RPE. For example, BTL’s 45 mil EPDM liner is comparable to BTL’s 30 mil RPE liner. EPDM is also naturally heavier than RPE. Because of these factors, EPDM isn’t supplied in extremely large panels since it would be too heavy and unwieldy to transport and handle, even with heavy machinery. Limited panel size isn’t an issue for small and moderate size ponds, but in the case of very large ponds, installers are forced to join multiple panels together on-site.
EPDM is a thermoset membrane, meaning that it can’t be heat welded without losing important qualities like flexibility. That means that EPDM panels must be seamed together using tapes and adhesives. For a large pond, joining multiple panels with many seams is a time-consuming task, and every seam represents one more potential failure.
EPDM enjoys a long-standing reputation as a high quality and reliable pond liner, and many experienced professionals and hobbyists continue to recommend it above any other, although it’s relatively high price point (including shipping) has allowed newer options like RPE to make inroads on its market share. We’ll go into more detail with pricing comparisons in our section on Pondering the Budget, which provides helpful details.
PVC
PVC (Polyvinyl Chloride) is a long-established pond liner material, popular based largely on its very low price and flexibility, although in the last decade it has significantly faded from popularity due to concerns with toxic plasticizers like phthalates leaching into the water. In some countries, PVC film was banned for use in food packaging.
The fact is, all PVC products contain plasticizers, since on its own, PVC is hard and brittle. In fact, it’s actually plasticizers and stabilizers that give the membrane its exceptional malleability. More recently, manufacturers have sought to identify and use fewer toxic plasticizers in their products, but even now, some cheaper pond liners contain trace amounts of arsenic and other chemicals that are toxic to fish, due to exposure during the manufacturing process.
Many prospective pond owners on a budget consider using PVC liners because of its low price point, but it’s still important to weigh the cheaper price upfront against PVC’s short lifespan. PVC is vulnerable to weathering from UV and ozone exposure, and plasticizers are prone to leaching out which leaves the liner brittle and vulnerable to damage. PVC has the shortest life expectancy of all modern liner materials, and typically must be replaced every 10 years, compared to other products with expected life spans of 30 years or more.
To maximize the lifespan of a PVC liner, it’s particularly important to shield it from exposure to air and sunlight. Most manufacturers recommend that PVC be buried under at least 12” of soil or sediment, which can be difficult to achieve in your average backyard pond. It’s also important to install an underlayment, which may significantly reduce the original cost savings.

Pondering the Budget
Setting up a budget for your pond project really should come first—before you even start clearing out a space in your yard or visiting local pond suppliers to price equipment. After all, unless your pockets are bottomless, there will probably be some compromises to be made and it’s a good idea to have your priorities in place before you fall head over heels for the latest Pond Emperor Pro 10K™ all-in-one pond pump/aerator/waterfall/lawn mower.
How Much Does It Cost to Line a Pond?
Fair warning: this isn’t really a fair question - either for you or for your pond supplier. Estimates that you’ll find online give very little useful information and are probably less informative than throwing a dart at a wall full of random numbers. Why? Because every pond is unique in size, shape, location, features, and special circumstances, and very few liners are directly comparable when it comes to pricing. Trying to compare a custom installed fiberglass liner to self-installed EPDM with underlayment or a pre-formed plastic liner is akin to comparing apples to oranges, strawberries, or even tricycles.Let’s look at some of the most obvious pricing factors:
iner type and size
Premium fiberglass or concrete pond liners not only cost more than most flexible geomembranes like EPDM (synthetic rubber) or one of the polyethylenes, but they have different installation requirements. Professional installation and a variety of options can add significantly to the price, while still falling under the “liner” expense category. Protective options like underlayment or installation necessities like sand, on the other hand, are not included in the price of the liner itself. There are so many variables, in fact, that one major website lists “pond liner prices by material” as ranging from a low of $0.20 to $130 per square foot.
Rigid Preformed Liners
Preformed liners are priced on their own set of measurements, and they’re inevitably higher, usually due to shipping costs, whether that’s charged separately or folded into the price of the liner. The cost may increase significantly if you choose a shape that has plant shelves or other shape complexities.
HD Polyethylene 270 gallons ~$450 at Local big box home improvement
Fiberglass 215 gallons ~$1110 from pond supplier *plus freight charges
Flexible Pond Liners
Pond liners made from flexible geomembranes are priced by square foot and it’s possible to purchase standard, pre-cut liners or order custom cut sizes through specialty fabricators like BTL Liners. Your local pond store may also be able to source custom sized liners, or there are typically a few options in limited sizes at a big box home improvement store,
Since flexible pond liners offer nearly infinite flexibility in pond designs, the important part with these liners is to correctly measure your pond - length, width and depth, since liner sizes can be deceiving. A 10x10 liner will cover a surprisingly small pond, for example. Check out our chapter Measure Twice, Order Once for detailed instructions about calculating the right size liner!
Most liner fabricators offer lower prices per square foot as the size of the liner increases. Keep in mind that BTL Liners can make single panel liners as large as 150,000 square feet, the largest in the industry, and we have experience in installing reservoir liners as large as 500,000 sq feet. No matter the material, unit prices will certainly vary from one extreme to another, so to get the most accurate pricing information, be sure to request an online or telephone quote from our team of experts.
Here are prices for pre-cut sheets in a few popular products. The table shows the specific product, the flat dimensions of the liner, an approximate size for the pond it would line, the approximate volume (use our volume calculator for a more detailed calculation), and price.
BTL-24 - 560 gal $110-$150
Flexible geomembrane liners are available in a potentially bewildering array of materials and options. Check out more detail in our sections Much Ado About Materials and Selecting the Right Pond Liner. Each option you choose, including the specific material, thickness, and any special coatings can affect the final price. It’s always best to call BTL Liners for an exact quote before you make your final decision.
Installation and Underlayment
Concrete and custom fiberglass ponds require professional installation, which adds to the price. If your pond will be especially deep, with steep sides, structural reinforcement will be necessary to keep the walls from collapsing.
Flexible geomembrane liners can usually be easily installed by hand, even for large irrigation ponds, although it might require a team of volunteers! Home installation for EPDM liners is also generally practical, but the material can get extremely weighty for large ponds and heavy machinery is sometimes required just to move the rolls into place and unroll them.
PVC, thin Polyethylene, and all EPDM liners require a protective layer of nonwoven geotextile to protect the liner from damage. These extra line items are typically priced separately from the liner material and will add to the actual cost of lining a pond.
Pond Liner Costs: Balancing Budget and Features
It can be overwhelming when you take a deep dive into all the possibilities for your pond. Do you choose the cheapest? The priciest? Which material will work best for realizing your dream pond? How will your budget stand up to the stress?
There’s no one who can definitively tell you, which is your best choice, but you can certainly narrow the options down by comparing the needs of your project to the qualities of the various liners and installation details. Once you’ve done that, you can compare final estimates from reputable businesses and see how they fit into your budget. Our section on Selecting the Right Pond Liner goes into detail on common concerns for most pond owners.
Finally, consider the reputation of those businesses and the level of support they offer both before and after you’ve purchased your liner. BTL Liners has years of experience in the pond lining business, ranging from small backyard ponds to 40+ acre irrigation ponds, as well as some of the most critical containment needs in industry. Check out our section How BTL Makes it Easy to see how our exceptional customer service is an industry standout!

Selecting the Right Pond Liner
Matching Your Liner to Your Needs
Most pond enthusiasts hope to create a pond that will last for years, perhaps even generations. After all, creating a unique oasis that will be a home to playful fish or delightful flowers and the wildlife they attract is ultimately a labor of love. It only makes sense to select a high-quality liner that will protect your fish and plants from damage and stress, not to mention the frustration and expense of endless maintenance and repairs.
Since each design and location and owner is unique, the specific challenges or needs for each pond will differ as well. Consider your plans and goals, your environment, your design to help you identify your priorities and then identify the liner that best meets those needs. Here are a few common situations that may get you started:
- Some pond owners who live in cold regions plan to overwinter their cold-hardy koi and goldfish in the pond, allowing the surface to ice over and their fish to enter a state of dormancy during the coldest months. You should be able to find information about the cold tolerance of any liners that you’re considering. Some liners become stiff during extremely low temperatures and are vulnerable to cracking. Avoid those if your region tends to experience extremely cold winters. Most of BTL’s AquaArmor products have cold crack thresholds below -85°F, which should cover most locations on the planet. Detailed specifications are available with each item description.
- Pond designs that leave liners exposed to the air and sunlight require especially durable materials and even specially coated liners to reduce or avoid rapid degradation from ozone and UV rays. While both RPE and EPDM have excellent weathering resistance, thicker liners will naturally withstand exposure for longer time. All BTL’s AquaArmor series offer warranties for exposure to open air and sunlight, ranging from 5 years for our thinnest 20 mil RPE liner to 20 years for liners starting at 30 mil. BTL’s AquaProFlex EPDM liner also offers a 20-year warranty.
- Are you planning a natural pond look or a formal design? Flexible liners conform most easily to the curves and corners of a pond, whether it’s a formal rectangular shape or a wandering, naturalistic pond with several depth changes. BTL’s AquaProFlex EPDM liner is exceptionally soft and flexible, making it very easy to work with. It is thicker than other options, though, so very tight corners and curves may appear bulky. BTL’s AquaArmor RPE liners are among the most flexible geosynthetic options, though they’re not quite as soft as EPDM. However, their exceptional strength means it’s possible to use a relatively thin liner without sacrificing durability. The AquaArmor line includes two 24 mil liner options, only half the thickness of EPDM. If easy installation and close conformation to tight corners is a high priority, consider BTL-24 or PPL-24 for the best experience and appearance.
- Some types of liner are available in many colors and in some cases may be visible below the waterline. Consider the colors and textures available and how they will blend with your vision. Thicker, reinforced liners are more durable and will tolerate the addition of large stones, attractive river rocks, and pea gravel to give a more natural look. In general, dark liners are less stressful to fish since their hiding spaces feel less exposed. Dark liners also do a better job of disguising sediment or detritus that may have settled to the bottom in between cleanouts.
- Realistically, what’s the chance that you’re going to want to expand your pond within a few (or even ten) years? The pond bug, once it bites, can quickly lead to a string of expansions, improvements, and endless tinkering. If you’re likely to succumb to the temptation, keep in mind that some pond liners are more suited to remodeling. Overall, polyethylene and EPDM liners are much easier to work with than most alternatives since it’s possible to seam or weld new liner pieces together. This allows you to expand your pond while maintaining a waterproof seal. Preformed and other rigid pond liners tend to be much more challenging, if not outright impossible.
- Have you built a pond before? The most important part of installing a pond liner is making sure you have no leaks, and the best way to ensure that is to order a liner that will cover your pond in a single panel. Seams that are added on-site are much more likely to leak than a single panel or even factory seams. BTL Liners can offer the largest single panels in the industry and can fabricate custom pond liners according to your specifications. Sometimes things don’t all go as expected and you run into a difficult corner during installation. Experienced support that’s available with just a quick phone call can make the difference between a long-lasting leak-free pond and a chronic headache. Don’t underestimate the value of expert backup!
- The health and safety of your fish and plants is undoubtedly high on your priority list, so be sure to select a pond liner that’s certified by the manufacturer to be fish and plant safe. Don’t rely on a salesman or your neighbor down the street to tell you whether a liner will harm your fish. Some health effects may take quite a while to appear in your fish, and individuals unfamiliar with the manufacturing process may not be aware of additives or coatings that can leach toxins into your pond.
BTL has a variety of Reinforced Polyethylene (RPE) products that are certified as NSF/ASTM-61, suitable for storing potable water. This is the highest possible quality designation and certifies that no harmful chemicals will leach into your pond water. BTL’s AquaProFlex EPDM liner is specially formulated to be fish and plant safe.
Save Now or Save Later?
When it comes to the realities of a limited budget, you may be forced to decide to skimp on equipment, the liner, or cut the budget a little bit on everything. Before you decide on that strategy, take a moment to consider what’s harder to replace in the long run if you have to cut corners? The pump or aerator when it fails due to premature wear? Or the liner when it fails due to tears, leaks, or UV degradation? Replacing a piece of equipment is a fairly simple matter of ordering a new one from your local supplier or online retailer and plugging it in. Replacing a liner, on the other hand, may cost thousands of dollars and will certainly involve completely emptying your pond, finding a place to temporarily house your fish & plants, and investing anywhere from several hours to a full weekend of work to install the new liner, refill the pond, and cycle it. Which sounds like the better expense to defer?
How to Measure and Order

There’s more to calculating the size of your pond than measuring its length and width, and it’s important to take this into consideration early in the design stage. Not only will it determine the type and amount of pond liner you purchase, it will also dictate the equipment - how powerful your pump needs to be and what size filter will suffice. It will even dictate how many fish you can support!
Depth and Volume
What’s this mysterious additional measurement? The depth of your pond. You’ll need to know this to calculate how many gallons your pond will hold, and you might be surprised how quickly that number rises. The more gallons your pond holds, the more powerful your pump must be and the larger your biofilter should be. Both pumps and biofilters are rated according to the volume of water they’ll be handling.
The depth and volume of your pond will limit other parameters as well. Any body of water (even that 10-gallon aquarium in your den) has a maximum population of fish it can support while keeping the environment healthy. In general, the limit is 1-2 inches of fish per gallon of water. So, your 10-gallon aquarium should be able to support 10 tiny tropical fish with an average length of 1”. Koi, however, can reach a mature length of 24 inches or more, and since koi and goldfish generally produce a large amount of waste, it’s a good idea to lean to the larger size for calculations. Keep in mind that your young koi will grow as they mature, so you’ll need to either calculate based on their expected mature size or plan to cull some of them as they grow - a painful prospect for any involved pond owner.
Keep in mind, too, that a minimum depth of 3 feet is required if you’re going to overwinter your koi and goldfish. Shallower ponds risk problems with temperature regulation which can disrupt the dormancy period for your fish.
In warm climates, it’s extremely important to keep a minimum depth of 30 inches, at least in some parts of the pond. When water temperature rises, it holds less oxygen, and your fish will seek deeper sections to avoid stress. It’s a bad sign when fish start gasping at the surface to seek air—providing a deep section gives them a safe place with plenty of available oxygen to rest and escape the heat.
To figure the volume of your pond in gallons, checkout our pond volume calculator here.
The volume of your pond may also limit your liner and design options. Preformed fiberglass liners are designed to support the weight and hydrostatic pressure of the water it contains, even aboveground and unsupported. Preformed plastic liners, on the other hand, cannot maintain their shape without complete support on all sides.
Above Ground?
Flexible liners, obviously, can’t be installed above ground unless they’re enclosed in some sort of supportive structure. However, since the liner will conform to the shape of the structure, above ground installation is not only possible, but relatively common.
Of course, if you’re planning on overwintering your fish, an above ground pond should have good insulation in the surrounding structure to avoid rapid changes in water temperature. In fact, insulation is a really good idea in areas with high summer temperatures as well.
Measure Twice
Once you’ve completed the design of your pond and you’re sure that the dimensions and volume are adequate to meet your goals, it’s time to order your flexible liner. It may seem more logical to dig the hole first, but since shipping will take a couple of days and an unexpected rain shower or other disturbance can cause significant damage to your carefully prepared excavation, we recommend that you calculate your liner needs based on your plan and allow some wiggle room in case your digging isn’t very precise. Once the hole has been prepared, do a sanity check to ensure your liner covers the entire excavation with enough allowance to anchor it securely in place.
BTL’s pond calculator will calculate the amount and dimensions of pond liner you should order based on some simple measurements, but we’ll discuss a few finer details here to help you get the most accurate measurements.
Look for the Maximum
Most ponds aren’t shaped as a simple circle or square. You may have chosen a fairly traditional kidney shape or figure eight, or you may have opted for a more natural, relatively complex shape. You may also have some variations in depth. One way or another, since your pond is a three-dimensional structure, you’ll need to accommodate each dimension in your liner calculation.
You’ll be measuring length, width and depth of the hole, but when ordering your liner, you need to ensure you’re measuring the maximum reach in each case.
Pond Calculator

Width: and Length:
Measuring for Length
Using the longest dimension, plan how your liner will lay. Whether you’re using woven polyethylene or EPDM, it should lie straight without attempting to follow a curve.
Once you know how your liner will lay, measure the maximum distance from one end to the other. If you’re not sure exactly where the maximum distance is on a curved pond, take several measurements in several locations and use the longest value.
Measuring for Width
For the width, measure perpendicular from the layout of your liner. Again, measure several points if it’s not immediately clear where the widest point is, and choose the largest measurement.
Measuring for depth
Once you know the maximum length and width of your pond, it’s time to measure the maximum depth. If you have several depth changes, use the deepest section. If your pond has a flat, level bottom, the job is easy.
Once your pond is dug and it’s time for the sanity check, lay a straight pole from one side of the hole to another and use a straight stick to mark the distance from the pond bottom to the bottom of your board. Take a few measurements and use the longest, making sure it’s within 3-4” inches of your plan.
Note: When using flexible liners, you’ll need to excavate with precision—it’s very difficult to build walls and floor back up and compact the soil enough to provide the necessary support to the liner.
The Apron
Once you have the pond's dimensions, it's time to add an allowance for the apron. The apron is critical because it's what you'll use to anchor the liner in place to prevent leaks, erosion, and other serious problems. Our pond liner calculator will automatically include that allowance, and you can check out section on Anchoring Techniques for details on a variety of anchoring options.
Irregular Shapes or U and L-shaped Ponds
BTL Liners is happy to customize a liner to match your pond’s specific shape and design. We have decades of experience in helping pond owners consider which approach will save money and guarantee a successful installation. Give us a call to discuss details about any custom liner work you need.
Underlayment
If your excavation is properly prepared, underlayment is optional when you’re using reinforced liner materials like BTL’s AquaArmor product. For other materials, like AquaProFlex, we do require the use of underlayment to protect the liner from excessive wear and extend the life of the liner. If you are planning to use underlayment, and you’re able to get it in a single panel, you should order slightly more than your liner—plan on ordering an additional two feet on each dimension to ensure there’s room for anchoring and overlap.

If you’re ordering an underlayment geotextile that will come with a fixed width, and must be overlapped or pieced together on site, plan to order about 1.5 times the square footage of your liner to allow for generous overlaps.
How BTL Calculates Liner Size
You may have noticed that calculating liner size isn’t a simple length by width calculation. Our tool accommodates the room to follow the contours of your pond’s walls, changes in depth, plus an allowance along each edge to allow secure anchoring.
The contrast between pond size and the required liner may be surprising. To help visualize how the liner is laid out, imagine looking at your pond in cross-section. Your liner must travel across the ground starting at about 24 inches from the edge of the excavation, to allow for anchoring. It must follow the walls and contours of the pond, across the bottom, and back up the opposite side, then stretch another 24 inches for anchoring on the opposite side. For the perpendicular measurement, the liner follows the same path.
Sanity Check
Once the hole is dug it’s a good idea to do a sanity check before you begin to install the liner. Precise digging can be challenging, and if your hole is wider or deeper than you planned, you’ll need to make sure your liner will fit. At this stage, you can use a string to follow the contour of the pond at the widest and longest points. After you’ve marked the string, measure it and compare it to the liner size you ordered. If it’s significantly off (12” or more), give your supplier a call and find out your options. BTL Liners has over 100 years of cumulative experience in lining ponds and we’ve helped customers through a host of problems—we’re happy to talk solutions with you!
How BTL Makes it Easy

A Wealth of Experience
Experience and longevity are important when you’re making critical choices such as what materials to choose for your pond, how to keep within budget, and how to manage complex installations. You want to know that your product will be backed by a reliable, experienced team who knows what they’re talking about and knows how to address all those questions that inevitably come up.
BTL Liners started in 1981 as Bend Tarp and Liner, when HDPE, PVC, and EPDM liners were the dominant players in the liner market. These were the days when PVC leached phthalates and EPDM wasn’t always safe for fish. BTL introduced the first double scrim RPE liners to the market, leading the industry in a new, innovative product that was exceptionally strong, durable, lightweight, and quick to install.
Since its early beginnings as a local supplier of tarps and liners, BTL Liners has grown to become a leading supplier of geomembrane systems around the world. Now, in its fifth decade of business, the company boasts over 280 years of combined industry experience among its dedicated staff.
Customer Focus
BTL’s dedication to providing world class customer service is clear from the very first impressions.
- The BTL team is dedicated to treating every customer with respect and friendship, whether they’re a homeowner or the largest company in the country.
- Phone calls are always answered, often on the first ring, by knowledgeable and helpful staff. Within just a few moments, it’s possible to obtain more specialized information from one of their top experts.
- BTL offers free quotes and both online and via phone, according to your preference. Whether you know what you need and just want quick, hassle-free ordering or you are you a new hobbyist or a seasoned professional seeking information on material or complex installations, don’t hesitate to give us a call. We understand how important your project is and we’re happy to discuss the details with you and offer practical advice. Even better, we’ll back up our advice with technical details and real-life experience, all in a friendly, professional manner.
- On BTL’s website, the Information Center is loaded with helpful and informative articles, e-books, and videos. The Question Center is full of hundreds of FAQs to help you with basic research on dozens of topics.
Timely and On-Time
When it comes to completing projects, businesses can’t wait. Time is money, after all, and even a few days delay in receiving your liner equates to lost labor and equipment time, as well as missed deadlines and possibly a ding to your reputation.
For backyard pond owners, a delay in liner delivery is no less devastating. That three-day weekend you painstakingly arranged to install your pond is wasted, then a sudden downpour in the days between excavating your pond and getting the liner installed may spell big problems for your project.
It’s reassuring to know, then, that BTL has always focused on shipping all orders accurately and as quickly as humanly possible. In fact, our liners typically ship within 24 to 48 hours of a confirmed order, sometimes even on the same day.
Our clients often need their geomembrane liners and materials on a short time frame. We maintain large inventories of our products on hand, ready to be cut and shipped. In fact, if your order requires more than 100,000 square feet of material, we can usually ship it within 2-3 days, compared to our competitors, who may need a month or more.
Even custom orders don’t faze us! Unlike many other retailers, BTL liners fabricates orders right here in our own 84,000 square foot facility, allowing us to process custom orders efficiently and produce the largest single panels in the industry.
Budget-Wise
We’re a company made up of practical people who understand the needs of our customers, from individual homeowners to large developers. We specialize in working directly with you to ensure your liner is installed using local resources, including personnel and equipment. Do you have a team of friends willing to help with a weekend installation? We’ll let you know how many you might need. Are you a major contractor planning a series of installations across several developments? We’ll help you evaluate whether it’s better to install each one manually or to bring in a team of professionals.
We’ll never oversell or undersell you just to bring in a sale. Instead, using our team’s vast experience, our goal is always to recommend the most appropriate products and provide a top experience for each customer.
Continuing Support
The challenges of installing a pond don’t stop at measuring and ordering the right size liner. Customers may have questions about storing their shipment, unpacking it, anchoring it, and handling any number of issues, whether complex or straightforward. You’re unlikely to get anything more than scripted responses, if ever get off hold, from an 800 “help” line. BTL Liners is a world apart from those anonymous online retailers. Not only do we answer our phone, but we’re prepared to offer practical advice, instructions, and even diagrams to help you complete a successful installation. We’re proud of our reputation as an industry leader in customer service and we are dedicated to proving ourselves with each customer.
Our liners are carefully packed and shipped to ensure they arrive safely at your location, damage free. Each liner panel includes clear markings and instructions on how to place, unfold, and adjust it, even for large multi-panel installations.
If you’ve ordered a multi-panel liner that needs to be welded on-site, we’ll not only include instructions, but we’ll also point you to helpful videos on our YouTube channel.
Got questions on how to safely anchor your liner? We’ll include diagrams and instructions for the most popular anchor trench method.
Installing under windy conditions? Been there, done that. We have some practical solutions that will make your installation a gentle breeze.
Need something else? Let us know and we’ll do our best to help or point you in the right direction!
Preparing the Site
This rocky soil with many clods will require substantial preparation to make an acceptable subgrade.

Prepared subgrade
In pond construction, the term subgrade refers to the soil found at the bottom of an excavation. It’s what will support the pond liner and, in turn, the weight of the water it contains. It’s a critical part of the overall pond structure and it deserves careful preparation to ensure that the pond has a long, problem-free life.
So why does the subgrade matter so much? Consider the weight of water pressing incessantly on the floor of a pond and on the liner itself, year after year. In a perfectly prepared subgrade, this pressure is passed directly and evenly to the underlying soil without exerting stress or strain on the liner. This is the ideal situation since, without excess stress or external damage, a liner can last virtually forever.
To maximize the life of a pond liner, then, the soil at the bottom and sides of the excavation must be carefully prepared so there is full, even contact between the liner and the underlying soil, with no protrusions, voids, or low areas.
What Makes a Good Subgrade?
Subgrades are important, but fortunately, they aren’t that complicated. Most soils such as fine-grained sand, loam, and clay serve just fine as subgrade if all rocks, sharp roots, or other materials that can puncture or put uneven pressure on the liner are removed. In addition, voids or soft spots should be filled and compacted. An ideal subgrade will be composed of fine-grained soil or sand that has been carefully compacted, is uniformly flat, free of excess moisture, and should not have any object, whether foreign or natural, that protrudes above the surface of the subgrade.
How to Prepare a Subgrade
As you finish excavating your pond, sift through the soil and remove any large or sharp rocks, sticks, organic material, and foreign objects. Using a rake, break up any large clods. A few small, smooth, rounded stones can remain, but they should be compacted into the subgrade so that nothing protrudes above the surface. After compacting, if any stones, clods, or other objects (of any size) are still protruding above the level of the subgrade, they should be removed.
Any voids, holes, soft spots, pockets, or dips in the subgrade should be completely filled with earth or sand and carefully compacted. There should be no areas where the liner must bridge a gap or support a soft spot. The finished subgrade should be smooth and even - no ruts or tracks left by equipment, for example.
Once the subgrade has been cleared, check it for protrusions - anything that sticks up above the level of the surrounding dirt must go, even if it’s a smooth rock. Level and even are the keywords here!
If you’re working in the wintertime, make sure there’s no ice or lumps of frost. Those will eventually melt, of course, but then you’ll have excess moisture and a void or soft spot beneath the liner, which can cause problems in the future.
Ideally, you’ll be able to complete your excavation within a day or two (depending on how large it is), which will help ensure that it doesn’t dry out too much or, even worse, get drenched or flooded in a storm. If, for some reason, there is standing water in your excavation, be sure to remove it completely.
A Note About Standing Water
Standing water in a pond excavation is an indicator of big problems to come and should trigger a full stop in your installation efforts so the source can be identified and you can deal with it effectively before it becomes a disaster.
Standing water, if it’s not 100% attributable to last night’s rainstorm, had to come from somewhere. If your area received 0.75 inches of rain but you have 1.2 inches of rain in your excavation, that indicates that your pond is receiving drainage from somewhere - perhaps it’s situated downslope of another part of your yard?
Surface Water Runoff
All in all, runoff from rain is not a complete disaster, but it definitely requires a solution. Surface drainage may travel miles before it ends up in your pond and will inevitably bring a variety of unwelcome contaminants into your pond - fertilizers, pesticides, animal droppings, and road pollutants, not to mention silt, grass clippings, and other debris. Even clean rainwater will raise the pH of your pond, if there’s enough of it in a short amount of time. It’s not possible to detect or correct for possible contaminants or constantly monitor the changing water chemistry, especially during a rainy season, but when the result can be unpleasant algae blooms or even plant and fish death, a few ounces of prevention are well worth it.
If your pond excavation is showing signs of receiving surface drainage, spend some time examining the flow pattern and install some sort of diversion to keep that water out of your pond. Berms (small walls) and French drains are excellent choices that can be attractive and don’t need to be incredibly expensive. Berms constructed of brick or stone are popular solutions. There may even be an opportunity to install a decorative stone berm that doubles as a bench for viewing fish up close. The berm should extend at least a foot below ground and several inches higher than the ground on the upslope side so that water flows around the berm instead of over it.
A planted border coupled with a French drain can also be an attractive solution if there is no significant slope carrying water to your pond. French drains are simple structures that involve digging a ditch several feet outside the edge of the pond and installing corrugated perforated pipe. The ditch should extend around the sides of the pond and release the captured flow into a well-drained area of the yard. The ditch itself can be filled with gravel, and native grasses or plants can help beautify the area as well as help take up excess moisture.
A High Water Table
If your pond has standing water even though the weather has been dry, you’re looking at a much more serious problem. Water seeping up from the ground indicates that you may have inadvertently tapped into your local water table. That may sound like a happy accident, in the words of Bob Ross, but in reality, it’s a lot more complicated than that. Aside from all the questions about permitting and use of public waters, there are important practical matters to consider before you embrace this windfall:
The height of a water table changes over the seasons -- that’s part of what makes a pond or a stream ephemeral, or seasonal. If your excavation has come into contact with the water table, expect it to happen again—if not next year, then sometime down the road. Moreover, when that happens, it will inevitably ebb and flow during the year, underneath your pond liner, and that’s where the big problems start.
Whenever there is water present both over and under a pond liner, the liner itself will begin to float—not to the surface, because it’s being held down by the water in your pond. But it also won’t remain flat against the bottom. A floating pond liner usually looks like one or more large blisters rising up from the floor of the pond, but these “blisters” are filled with groundwater, not air. When this occurs, the pull on the liner may cause it to shift or even dislodge entirely. Over time, the effects of water table movement on saturated soils can erode the pond’s ground support and impair its structural integrity. Any of these results spell bad news for your pond.
Conflicts with water tables and ponds are challenging to fix; so much so that you are far better off stopping the project and considering an alternative placement (do you have higher ground on your property?) or look at some ideas for above-ground ponds.
A Note About Troublesome Soil
If your soil just won’t cooperate in establishing a well-prepared subgrade, you have a few options. One is to add several inches of fine bedding sand to the floor of your pond - enough to cover all irregularities. This method requires compaction before you place the liner to ensure the liner doesn’t stretch when the sand settles. You’ll still need to do your best to remove whatever stones and roots you can, but six inches of bedding sand could be a good strategy to protect the integrity of your liner. Keep in mind, though, that the walls of your excavation should also be free of rocks and protruding roots, since there will be pressure against the liner there as well. If you can’t manage an appropriate surface on the walls, or if you don’t want to lose six inches of depth in your pond, an underlayment is your best bet.
Underlayment is actually required for use with unreinforced liners like PVC or EPDM due to their vulnerability to punctures, tears, or even abrasion. Underlayment is a non-woven geotextile that feels similar to felt and it serves several functions. It protects the pond liner from sharp objects in the oil and generally reduces the risk of punctures. It stabilizes the soil beneath the liner, presenting an even supporting surface, and it extends up and over the walls of the pond, protecting the liner over the whole surface. Underlayment is also readily available and easy to install.
BTL Liners offers an affordable non-woven geotextile underlayment to accompany its AquaProFlex EPDM liner, although it can be purchased separately as additional protection for any liner. Give us a call to calculate how much you’ll need and get a guaranteed price quote!
Equipment You’ll Need
When you’re planning your excavation and installation, be sure to consider the equipment you’ll need to accomplish the job as quickly and efficiently as possible. While it’s possible to construct a small pond with a shovel, a small rake, and some good backs, medium or larger ponds will be much easier if you can borrow, rent, or purchase some powered equipment. In this case, a pond with sides longer than 6 feet and 18 inches or more deep qualifies as medium. It may even be a good choice to hire professionals for a project of this size, since mistakes can be difficult to remedy.
- A turf cutter can be a big help if your pond is going in a grassy area, especially if you need to reinstall the turf around the perimeter for an attractive edge treatment.
- A shovel, or several if you have a crew of volunteers, works well for digging out a small pond, and the shaped blade helps you scoop up and remove the soil. However, a power assist quickly becomes appealing when your back and stamina start to flag.
- A trenching spade has a longer blade than a gardening spade and will help you create flat, even sides.
- If your soil is hard, you may want to start by breaking it up. A pickaxe or mattock can help here, but you may find an auger or powered trenching tool easier in the long run. You’ll still need to remove the loosened dirt, of course.
- Mini electric excavators are available that can dig just over five feet deep, which is plenty for most backyard ponds, while hydraulic excavators can dig holes over eleven feet deep.
- If your pond is larger, especially if you have soil that’s hard, or full of rocks and tree roots, it’s probably time to call in the bigger boys. A skid-steer loader or backhoe are two very useful examples, and they’re even available in mini sizes that are easy to get into a backyard with minimal disruption. These can be effective in excavating the rough shape of the pond, but final shaping of the sides and bottom will still need to be done by hand. Check your local resources to find if any are available to rent if you’re feeling brave, or you could look for an experienced freelancer if you’re looking to save some cash.
- Backhoes are typically the best tool for the quickest and most accurate dig, and an experienced operator can create a fairly detailed excavation with minimal effort, leaving you with less finishing work to complete.
- Don’t forget a steel garden rake and a hoe. They’re critical for final work on the subgrade, from removing small rocks and digging up roots, to evening out the prepared soil for a level, even bottom.
Installing the Liner
Start with the Trench
Ideally, you will have already chosen your anchoring technique before excavating the pond itself and completed any digging or clearing that goes along with it. If not, now is the time to get it done—before the liner is in place!
Underlayment
Underlayment is the non-woven geotextile that’s required under unreinforced liners that are more vulnerable to punctures, like EPDM or PVC. It has a felt-like texture and acts as a cushion to prevent sharp objects from poking through.
While underlayment is not required for use with RPE liners, it may be worth considering if you’ve elected to go with a particularly thin liner and your subgrade isn’t perfectly prepared. By the same logic, if you’ve got a troublesome subgrade with rocky soil that won’t be cushioned with 4” or more of subgrade sand, underlayment is a good investment.
Since the underlayment fabric is fairly lightweight, it’s easy to install. If you’ve purchased it from BTL Liners, it will come with instructions on how to lay it out. Unfold it as indicated and, working from the bottom, press it down along the contours and corners of your pond. You’ll need to have several feet of allowance extending beyond the edges of your pond for anchoring, so you can use some weights to hold the edges in place, but don’t trim it yet!
If you have to run several widths of underlayment together to match the width of your pond, make sure there’s a generous overlap (18” minimum) to avoid any gaps from appearing once the liner itself is laid.
The Liner
Once the underlayment is in place, it’s time to tackle the liner. Your liner should arrive packaged with specific instructions on how to unpack and lay it out. Be sure to unfold it according to the dimensions shown on the packaging so you’re not forced to drag it around! EPDM, in particular, can be quite heavy, so plan to have some help for this step and do your best to minimize movement as you lay it in place.
How to Install Your Pond Liner
The liner is laid directly on the subgrade, or top of the underlayment if you’re using one. It should be pulled enough that it lies flat, without wrinkles across the floor of the pond. Press the liner along any details of the floor and walls, such as depth changes or plant shelves, and make sure the liner is in direct contact at every point as it travels up the shelf walls.
Depending on the size and depth of your pond, and the weight of your liner, you may be able to press it into corners using a soft tool like a broom, or you may have to enter the excavation and walk it into place. Use clean, soft-soled shoes and tread carefully if you’re doing this! If necessary, you can place a few rounded stones along depth changes and shelves to make sure there’s full and complete contact with the soil.
Curves and corners
Pond liners are flat sheet material, unless you order a box welded liner that arrives in a perfectly formed shape to drop directly into your excavation. Since it’s essentially a 2-dimensional material conforming to a 3 dimensional shape, there will be areas where it will need to be folded or pleated in order to fit tightly—think of wrapping a gift and folding the paper for a neat end. Careful folds and pleats are more aesthetically pleasing where the pond liner is visible, and they can help keep the liner evenly spread out when it’s anchored.
To form neat pleats, start at the upper edge and lift no more than an arm’s width of excess liner straight up, taking up slack and folding it away from you to form a pleat. The pleats at the top will be wide and spaced far apart, which will give a neat, even appearance, while they narrow to points along the bottom of the pond. You can use liner tape to secure the edges if you’ve got a tight spot and the pleats aren’t cooperating, but unless you’re using a particularly thick or stiff liner, it shouldn’t be much of a problem. As you fill the pond with water, the weight will also hold the folds and pleats in place.
Keep in mind that, despite our comparison, this isn’t a matter of wrapping a neat, rectangular gift box, and we all know that irregular shapes don’t come out perfectly even. So, there will be wrinkles and some awkward folds—don’t let that bother you, just work with it to get the liner as smooth as possible. The smoother you can get it, the less visible it will be.
The vertical sides of Inside corners can be particularly difficult to fold for a neat, attractive look. In this case, you can invert the pleat by folding and pushing the excess behind the straight liner as it rests against the wall. Again, smooth stones, liner tape or adhesive can hold the folds in place until the pond is filled with water.
Filling the Pond
Once your liner and any additional layers are neatly folded in place, with enough of an apron to extend into the anchor method of your choice, it’s time to start adding water. The weight of the water will help to flatten your folds and pleats and keep them in place, so if you have any adjustments to make, this is essentially your last chance. Since the water will help support the weight of the liner, this is actually a good time to work any remaining trouble areas. Fill the pond just a foot or so at a time, and feel free to stop the process so you’re not rushing along to beat the rising tide. As the water rises, remove any rocks you have used to hold things in place.
Once the pond has filled completely and the liner is completely stable, it’s time to anchor it in place. It’s been a lot of work to this point, but the end is finally in sight!
Anchoring the Liner

During installation, you should have allowed the liner (and underlayment, if used) to overlap the edges of your pond by 3 feet or more. This overlap is what you’ll use for anchoring, and it’s critical—don’t skimp on it!
There are several different ways to anchor a liner, and you’ll see many different methods described on youtube or in pond owner forums. Ultimately, it’s your choice which method to use, but we’ll describe the most reliable and popular options. Bonus: these are simple to implement, add additional protection to the liner and are easy to cover for an attractive look.
The exact type of anchoring that best suits your pond will depend largely on its size and style. Typical backyard ponds are well served by an anchor trench design, the most popular method. Anchor trenches work very well for both vertical and sloped sides, but if your pond has a somewhat steep slope from the edge to the bottom of your pond and you want to use decorative river rock, rounded gravel, or some other decorative fill to disguise the liner, an anchor trench with a speed bump detail is a great option because it prevents the rocks from slowly sliding down to the bottom.
Even extremely large ponds, lakes, and reservoirs use anchor trenches for a strong and reliable anchor, although their trenches are usually larger and deeper than what you’ll use.
Anchor shelves, in contrast, are both simpler and easier to construct, but to get the same degree of secure hold, they require large shelves, some as much as five feet wide. The shelf will eventually be covered over with turf, gravel, or some other cover material, but most backyard ponds don’t have that much real estate available for digging up in the first place, so the anchor shelf is generally employed in large installations, like irrigation reservoirs or fishing lakes covering many acres.
Anchor Trench

Once your liner has been spread out, neatly folded, and the pond has been filled, it’s time to anchor it in place. Even though the weight of the water will all hold the liner in place from the top, there are lots of ways the liner can shift over time or suffer damage unless it’s held firmly in place and protected. A loose liner edge, for example, is likely to sink into the pond, allowing water to drain and collect under the liner itself, causing the liner to bubble up or float and introducing a host of problems. An exposed liner edge is also likely to be exposed to extra wear and tear, weakening the liner itself and compromising its anchoring ability. A loose or unstable liner is much more trouble down the line than the time you’ll save by skimping at installation.
An anchor trench is the standard treatment for pond and lake liners of all sizes. It’s simple to install, easy to cover with decorative elements, and extremely secure. It protects the liner from surface damage from scuffing, tears and punctures, as well as extended UV exposure.
To construct an anchor trench, you’ll dig a trench around the pond’s perimeter, approximately 12” from the edge. The trench should be 8-12” deep and 8-12” wide. The larger your pond, the deeper and wider the trench should be. Reserve the soil you’ve removed to fill the trench back in when you’re done, but you’ll probably want to store it on a tarp, so it doesn’t smother any grass or groundcover.
Once the trench is completed, the liner and underlayment in place, and the pond filled, it’s time to permanently anchor the liner into your trench. Use the overlapping liner (plus underlayment if applicable) to cross the 12” border of undisturbed ground and dip down into the trench. The liner should reach down to the bottom and across the trench, reaching up a couple of inches on the other side. If you’re using underlayment, extend that over the edge of the liner and fold it over by a few inches to completely protect the edge.
When the liner is first laid into place, it may not want to sit cleanly in the bottom of the trench, so feel free to walk along the trench, pushing it into place with your feet and dropping fill dirt behind as you go to hold it down. The appearance of the liner at this point isn’t important, because it will be completely covered. Once the liner is correctly placed in the trench, go ahead and trim off any excess material. (Feel free to save any larger pieces (protected from the elements) just in case you need extra material for a large patch or to join a new addition in the future.)
Once the liner is trimmed, completely fill the trench up with your excavated soil, sand or gravel. If you’re using soil, make sure it is well compacted as you go. This filled trench is the primary anchoring force of this model, and a sunken area over the anchor trench will require prompt filling, so it makes sense to take care of it right at the beginning.
Once the excess has been trimmed and the trench has been filled, you can cover the trench area with sod, making sure no sod is in contact with the waterline, or use decorative stone to create a walkway, overhanging shelf, or other creative look. If you like the look of pebbles and river rocks extending from the edge down into the water, that can be a lovely naturalistic effect. Check out our next section on the speed bump detail for some tips on that option.
The secure mechanism of the anchor trench and the protection from subsequent cover materials make this a highly recommended anchoring method for virtually all ponds. The liner is buried, which protects it not only from UV rays but from shifting and damage from foot traffic, garden tools, and errant lawnmowers or weed whackers. In fact, this is an effective anchoring method for all types of liners, regardless of the material.
Sloping Walls: Speed Bump Detail

A speed bump detail is not, itself, an anchoring technique, but we include it here because it’s installed during the anchoring step. The speed bump (or curb) acts as a block to keep decorative gravel or river rocks intended to extend into the edges of the pond from rolling to the bottom. They can’t be used for vertical pond walls but are suitable for those with a low to slightly moderate slope.
If you’re planning to use a speed bump, plan ahead for how deep you want to place it and how you’re going to construct it. You can simply leave a bump of soil along the slope of the pond, which will be covered and protected by the liner, or you can add a perforated pipe. Generally, when correctly installed, the perforated pipe will be more durable than the soil option.
Corrugated, perforated drainage pipes will typically serve just fine in this application, and they have the advantage of being flexible enough to follow curves in the pond’s outline. They’re also available in several sizes, and inexpensive. The pipes will be covered and held in place by geotextile fabric (underlayment material), so be sure to order some even if you’re using an RPE liner without underlayment. A BTL representative will be happy to help you figure out how much you’ll need and give you some tips on how to manage tricky installations.
A speed bump detail should be installed before the pond is completely filled. In this case, you’ll place your perforated pipe at the level of the pond you want it to sit. Start by placing your underlayment at the bottom of the anchor trench, extending a few inches across the bottom, adding backfill or a few stones to hold it in place. Next, extend the underlayment over the pond wall, and down the slope until it reaches the pipe position. This underlayment will rest on top of the liner. Don’t worry—it’s black and will be covered with decorative river rock and smooth gravel, so it won’t be visible from above.
Pull the underlayment sheet under the perforated pipe and back to wrap the pipe, with the end of the underlayment extending a few inches beyond the pipe. Use a propane torch to lightly heat the material and press it together for good adhesion.
Geotextile underlayment floats, so once the underlayment has been thoroughly secured in place, go ahead and add your decorative material along the edge of the pipe to keep it from rising as you’re filling the pond.
Installing a Curb or Speed Bump
Note that this speed bump detail calls for a perforated pipe. The geotextile underlayment allows water to drain through along with the perforated pipe. You want water to be able to circulate through the pipe, just like the rest of the pond, so avoid using a solid pipe!
Vertical Walls: Disguising with Boulders

If you’ve got plant shelves and some aquatic or marginal plants, the borders and walls of your pond will probably be attractive and well disguised. If you choose to eschew plants (perhaps your fish can’t resist nibbling on them), you may prefer to line your pond with stones. This is entirely possible, but it does represent some extra work and a potentially high expense.
Essentially, after you’ve installed your liner, but before you’ve added water, you’ll stack stones along the edges of your pond, from floor to top, attaching them carefully to each other with mortar or foam designed specifically for the pond environment. These walls must not lean or threaten to fall over, so consider adding some basic reinforcement and build the base out wider than the top.
The rocks used for this kind of decoration usually aren’t rounded or smooth, so you’ll need to add a non-woven geotextile “underlayment” over your pond liner to shield the liner from damage due to abrasion and wear. This black underlayment will be completely covered by rocks, so it will not be visible to the casual observer.
Anchor Shelf

An anchor shelf is an effective treatment for keeping a liner in place, but the shelf has to be fairly wide to provide the same security, so it’s not quite as popular for small and medium sized ponds.
Instead of a trench, the anchor shelf uses a broad, flat excavation along the edge of the pond. Unlike the anchor trench, the excavation will reach somewhat below the maximum depth of the full pond, so it’s possible for water to wash up shallowly along the edges. The shelf should reach about 12” deep and about 2 - 6’ wide.
Draw the liner across the width of the shelf and extend it up 6 - 8” on the far side, including the underlayment, if you’ve used one. Next, use smooth river rocks, gravel, or sand to cover the liner and fill the shelf up to grade and extend slightly beyond.
Keep in mind, when using this method, that water should never be allowed to get under the liner itself. Since the liner is at grade in this technique, carefully consider your weather and drainage conditions. If it’s possible that this area around your pond will have standing water after a heavy rain, this may not be a good option for you since water may be able to soak into the ground and travel underneath the liner.
Special Features and Situations
Streams and Waterfalls
For pond owners who want a little extra oomph to their backyard pond, whether it’s a natural touch or just the sound and sight of a burbling stream and small waterfall, there are plenty of kits to purchase or you can design and install your own. You’ll need to purchase a separate pump for the waterfall, since at some point it will be moving water uphill, and the pump will need to be designed to handle that load.
For the stream itself and the waterfall backing, you can use one of several styles of preformed liner or you can use a flexible liner that will support a more custom installation. Whichever option you choose, the stream and waterfall need to keep the water contained with no leaks and minimal splashing, or you’ll find your pond levels dropping. Topping off pond levels can become quite a chore, especially if you find yourself regularly adding a significant amount and having to repeatedly adjust the water chemistry.
The appropriate material for your liner depends on the width of the waterfall course, which directly determines the volume of water you’ll be pumping. Narrow waterfalls (around 6” wide) need a pump with a flow rate of 200-400 gallons per hour. Relatively inexpensive, lightweight plastic forms can handle this load. Fiberglass and polyurethane or pre-cast stone forms are wider and more attractive but require a higher flow rate.
Even with pre-formed units, you’ll need to install a liner underneath to capture splashing water and return it to the pond. If you prefer, flexible liners such as RPE or EPDM can be used for custom designs and they’re easy to cover with small pebbles or larger rocks secured with mortar that give the look of an authentic river bottom. In either case, if you use the same material as your pond liner, these sections can be seamed together for a secure, waterproof connection.
If you’re using a kit, however, and the waterfall liner is a different material than your pond liner, you’ll have to rely on simply overlapping the liner where it meets.
Above Ground Ponds
on your needs, an above ground pond may be the perfect solution to your backyard design. Your soil type may be unsuitable for an in-ground installation, you may be dealing with a high-water table, your ideal location may be in the middle of a significant flow pattern for storm runoff, or you may simply find that your back is better suited to managing and viewing something a bit higher up. Whatever your reason, above ground ponds can be an attractive and practical addition to your yard, deck, or patio.
For those who prefer a pre-formed pond shape, fiberglass is the material you’ll need for an above ground installation. It’s the only one strong enough to support the considerable weight of water and the hydrostatic pressure that pushes outward on the walls. Some homeowners will build a square or circular enclosure around an irregularly shaped pond form and fill in the gaps with plants and decorative stones or other elements. In this setup, lining the enclosure with a flexible, impermeable material is still a good idea as a secondary containment to avoid flooding the area if there’s a catastrophic failure of the primary liner.
Exposed applications
Sometimes, covering a liner completely isn’t the goal for a pond installation. Aside from a single showstopper pond, temporary ponds set up for the spring and summer at local retailers are probably focusing more on the fish or plants than complete coverage. From time to time, there may be a delay of weeks or even months between filling your pond and tackling a decorative border and landscaping. In these cases, it’s important to remember that your liner will be exposed to ozone, UV rays, and other pollutants (acid rain, anyone?) in the meantime. A degraded liner simply won’t perform as well, or long, as one that has been adequately protected.
If your intended purpose or installation plans involve leaving your pond exposed to the elements, even for a relatively short period of time, it’s important to look for a liner material that has excellent resistance to sunlight. Fortunately, there are some excellent products that offer warranties for direct exposure. All of BTL’s AquaArmor products offer exposed UV warranties starting at 5 years for our thinnest liner, BTL-20 and ranging up to 20 years for our RPEL-30 and thicker liners. BTL’s AquaProFlex EPDM liner also offers a 20-year warranty for exposed applications.
Maintenance and Cleaning

Visual Inspections
Once your pond is set up, planted, and stocked, you’re ready to kick your feet up with a refreshing glass of iced tea and relax. Go for it! You’ve put in the work and now it’s time to enjoy it.
But, as in all worthwhile ventures, man-made ponds are not a “set it and forget it” proposition. You will need to plan for regular maintenance and cleaning chores not only to keep your liner in tip-top shape, but to ensure your fish, plants, and the microbiology of the pond itself are thriving.
When your pond is new and still settling in, it’s a good idea to make a weekly visual inspection of the installation, including the anchoring system and the protective cover materials. Make sure that no liner edges are peeking up above ground and that there are no parts that look stretched out of shape. If you do see some areas that look strained, you’ll need to identify where the movement is happening and rectify it before damage occurs. Give us a call if you need some experienced input.
If the ground looks sunken along the anchor trench, you’ll need to fill it in immediately with compacted dirt, gravel or sand so the liner doesn’t pull loose.
Unless you’re planning for an exposed liner, make sure that your cover material (sand, rocks, sod, etc.) is evenly spread and deep enough to withstand occasional disturbance, whether that’s human or animal foot traffic, rainstorms, or maintenance activities themselves.
Cleaning
Few man-made ponds thrive with neglect, whether they’re populated with fish or simply planted. While you may seek to imitate the healthy balance of a natural pond, you’ll still need to regularly clean and maintain your own little corner of paradise to support the ecosystem where there’s a disconnect from natural processes.
There are several regular maintenance tasks you’ll undertake primarily to maintain the health of your fish and the quality of your water, such as monitoring your water chemistry and performing regular water changes. If algae become a nuisance, you may find yourself adjusting your filtering strategy or even your fish load. If algae is an eyesore, some more direct cosmetic intervention may be necessary, including scrubbing pond walls. Whatever maintenance tasks you undertake, keep in mind the integrity of your liner. No one wants to finish their spring cleaning only to discover their pond has sprung a leak!
During cleanouts, focus on protecting the liner while:
- Cleaning/scrubbing the liner
- Moving large objects around the perimeter of the pond
- Removing debris from the bottom of the pond
- Performing major water changes
Sludge, mulm, that brown or black stuff that seems to collect on the bottom of your pond: it can be an eyesore, but it can also eventually harm your fish and emit objectionable smells. It’s composed of fish waste, excess fish food, silt and organic matter that’s been carried in by the wind or storm runoff, and it needs to be removed on a regular basis. That may be during an annual spring cleaning, a late fall preparation for overwintering your pond, or even a monthly chore if your pond just seems to attract dirt.
Many pond owners opt to use a pond vac to suck up sludge, sediment, or whatever happens to be down there. That’s an effective technique, although you’ll still need to manually remove sticks and other matter that the vac can’t accommodate. If you have a rock or gravel bottom, you may also want to use a rake as you go to gently stir up any collected sediment. This kind of cleanup shouldn’t be too disruptive to your pond’s ecosystem, but if you have a lot of sediment that may be stirred up, it’s a good idea to move your fish to temporary holding tanks to avoid stressing them and damaging their gills.
To protect your liner during this process, avoid poking at the liner with anything even slightly sharp, especially when trying to stir up a gravel bottom. Abrasions will rarely cause serious damage in the short term, but they won’t heal, and even minor stress, repeated over time, can eventually lead to leaks.
Storm debris may include tree limbs, lightweight lawn furniture, or other detritus carried in on the wind. If you live in a windy area or one where tornadoes and severe weather are a common occurrence, the types of debris that you find in your pond can be quite interesting!
Regardless of what kind of new items decorate your pond, care should be taken in removing them to avoid damaging the liner. Not only do you need to be wary of sharp branches and edges, but if you find that you need to stand on the borders of your pond or even directly enter it, there are more risks to consider.
Avoid standing directly on the very edge of your pond, especially when you’re trying to lever out a heavy or awkward item. Spread a board alongside the border and kneel or stand on that to spread out your weight. If you see any signs of sinking where you’re standing, step away and find another way to approach the problem. A weakened pond wall is not anything you want to deal with!
If you do have to enter the pond itself, wear clean, soft soled shoes and step carefully! Some liners, especially EPDM, are extremely vulnerable to damage from petroleum products like oil and gas, so it’s critical to avoid tracking anything from your garage or driveway into your pond (not to mention the effect on your fish!).
When you go into the pond, be especially careful not to step or lean on anything that will dig into or puncture the liner. A sharp stick, a dropped tool, even a dislodged decorative rock could cause serious damage. If you’re dealing with a lot of debris and it’s hard to see where you’re walking, it’s a good idea to move your fish to temporary quarters and partially drain the pond to get a good look at what you’re doing.
Cleaning Algae that have taken up residence in your pond is a complex issue. Planktonic algae, or microscopic cells that float, suspended, in the water can’t be cleaned out with a pond vac. If your pond water is greener than you’d like, it’s time to look at your biofilters and attack the problem at the source: excess nutrients. If you’ve got macroscopic algae that forms strings or mats, a pond net is a good solution during regular cleanups.
On the other hand, if you’ve got a lot of algae that adheres to rocks, walls, and decorative elements in your pond, you’ll probably want to take a more direct approach. Keep in mind that not all algae is bad - in moderate amounts, many algae are a valuable part of your pond’s ecosystem. But still, that towering white quartz centerpiece standing in the center of your pond just doesn’t have the same impact when it’s covered with a creeping green mass.
In this case, a quality brush and elbow grease are your best tools. While you may need to use a heavy, relatively stiff brush to attack that quartz with its rough texture and crevices, you’ll need to use a softer approach on your liner. The good news is that your liner won’t have the same deep texture as a stone, so any algae will be easier to remove. We recommend a deck brush with flexible, nylon bristles—one with an extendable handle can be especially useful. Don’t use a power scrubber or brush that’s sharp and painful to press to your arm. Abrasion and tiny punctures are no liner’s friend.
If you’re going into a full-scale cleaning like this, be sure to remove your fish while you’re working, and perform as close to a full water change as possible. Consider pumping the cleaned pond completely and using your reserve water to partially fill the pond. After a major scrub like this, you’ll have lost many of the beneficial bacteria that help maintain the chemical balance of your pond, so keep a careful watch on your water chemistry for the next few days while it goes through a mini-cycle.
There are a few more helpful points in our Learning Center article on Maintaining a New Pond Liner.
Whatever kind of maintenance you end up doing, see if you can keep the mulm, algae, and especially the water that’s removed during the process, all of which contain valuable nutrients for plant growth. String algae and large amounts of mulm can be composted, while pond water can be applied directly to garden beds, and even trees for a healthy growth boost.
Identifying and Repairing Leaks
Leaks are a persistent nightmare for pond owners, but when you’re using a high-quality liner with a proper installation, they’re pretty rare, and in most cases they’re not as hard to fix as you may think. In this section we’ll talk about diagnosing the leak, locating the leak, considering your best strategy, and making repairs for both RPE and EPDM liners. Note that the repair techniques and materials are different for the two types, since they’re completely different materials.

Is it Really a Leak?
Not all water loss in a pond is due to a hole in the liner. Sometimes the water loss doesn’t even have anything to do with the pond itself. If you’ve noticed that your water levels are falling unexpectedly, the first thing to do is quantify the issue, and that involves taking simple, old-fashioned measurements.
Choose a specific point in your pond from which you’ll take depth measurements and use that exact point every day. Using a blunt dowel or pipe with a protective cover to prevent scratching or puncturing the liner, push it down gently so it has direct contact with the liner, since decorative gravel and other coverings can shift and give misleading readings.
Mark the depth of the water on the stick and note a date and time. Repeat each day, or even multiple times a day if the water level is falling quickly. The rate of water loss can be important as you make a diagnosis and consider solutions. Once you’ve had several days of measurements, it’s time to start eliminating some possible causes.
Common Causes of Water Loss
Evaporation: one extremely common cause of water loss in a pond is evaporation. Especially if the season for warm, sunny weather has just started, the rapid increase in evaporation can be alarming. There are a couple of ways to determine if this is the culprit.
- Determine the surface area of your pond. If you don’t recall that information, you can use your pond liner dimensions or BTL’s pond liner calculator. Once you have this information, contact your local weather station or county extension agency to find out the evaporative index for the days you were measuring. They should be able to help you calculate the expected inches of evaporative loss based on the weather during the period you were keeping measurements.
- You can investigate ways to shade your pond from direct sunlight by installing a temporary canopy. Do NOT install a cover directly over your pond! Much like the interior of your car, a covered pond can rapidly rise in temperature and could kill your fish. The idea is simply to shade it. If you find that the rate of water loss is substantially lower (though not likely zero), then evaporation is probably your culprit. Unless you want to make some shade canopies a permanent part of your pond setup, you’re probably going to have to plan for frequent topping off.
Splashing: if you have a waterfall or splashing fountain, this is another common source of water loss, and again there are a couple of ways to detect it.
- Start by observing your waterfall and fountains. Is your area windy? Is the wind carrying water away as it falls? Look for damp areas slightly downwind of the water feature. If this is happening, you’ll need to find some way to shield your feature from the incessant wind, redesign the feature to flow closer to the ground, or get used to regular topping off.
- Alternatively, after recording your water loss over the course of a few days, you can turn off your waterfall and fountain completely and monitor water levels for the same span of days. Is the total loss significantly less? If yes, you can solve for splashing problems, but you may first want to spend some time examining the feature’s pump for leaks.

Sod & Roots: While aquatic plants that are submerged won’t drain water away from the pond, nearby plants, including sod and landscaping plants that overhang the liner, can quickly draw water levels in their search for effortless water access. A visual inspection should be all it takes to detect this problem. Any plant with roots hanging into the water is a potential culprit. To solve the problem, simply cut back grass and bedding plants several inches from the pond’s edge—decorative stones or a wooden deck are a great alternative. If it’s a recurring problem, consider installing a root barrier to keep them from spreading towards the pond.
Equipment: Pond equipment is vulnerable to leaks, and quite frankly it’s a lot easier to detect problems there than in a pond liner, so it makes sense to eliminate that possibility first.
- Start by checking around each element of your pond setup: filter, hoses, pump, as well as connections between your pond and any water features. Are there wet areas or visible leaks? If so, consider either repairing the equipment (gaskets, damaged hoses or pipes, etc.) or replacing it. Damaged and worn-out equipment is only likely to become worse over time.
- You can also turn off the equipment like you did while checking for splashing. If this seems to be the common denominator, you may need to carefully examine each piece of equipment for small cracks, pinholes, dried up gaskets, etc. Sometimes a blockage in a pump can cause water to back up as well. If you find something, don’t stop checking there. Other similarly aged equipment may have similar issues and it’s best to tackle them all at once.
Liner Movement: Check along the perimeter of your pond and water features, especially along artificial streams where there may be only a preformed liner, or the flexible liner is not as securely anchored. An errant fold or loose corner that channels water across the stream’s edge and into the yard can lose a lot of water fast. In this case, the solution is easy—move the liner back into place and secure it so that water remains where it belongs. If it’s a recurring problem, you may need to build up the borders of the stream bed to form a small berm.
Where is the Leak?
If you’ve checked for other common water loss gremlins with no success, a leaky liner is a possible culprit. Visually inspecting your liner is always a good place to start, but it’s rare to see a significant hole in the liner by simply glancing at your pond, so unless you know of a specific accident involving an errant screwdriver or an unexpected visit from a sharp-hooved deer, you’re going to have to do some detective work.
First, you have to locate the leak itself and you’ll find lots of tools and products designed to help you. In all the variations and products out there, however, they all boil down to essentially two strategies. One is to add a colored liquid which is drawn to the leak and will exhibit a visible track. The second is to lower the water level until the water loss stops and do a visual search for damage. A combination of the two methods using a ping pong ball is another option.
Using the Dye Method:
If you have a single leak on the walls of your pond, this could potentially be the fastest and easiest way to find it. Pond dye (not pool dye) that’s certified to be safe for fish is produced specifically for this task and is formulated to fade in a relatively short period of time. Pond dye that’s intended to give you water an artificially blue or aqua color won’t work for this purpose since it’s formulated to easily disperse.
Some pond owners suggest using milk as a cheap alternative to dye, but it’s hard to predict whether this could cause problems for the fish. If you choose this route, we recommend following it up with a good water change, at a minimum.
The basic mechanism of the dye method is to allow your pond water to become completely still, then add small amounts of dye along the pond’s entire perimeter and watch for dye movement. Ideally, the dye will flow toward the leak and converge at a specific point, indicating the depth and precise location of the leak. This can be a great method for pinpointing even a small, slow leak, but it’s unlikely to work well with multiple leaks at different depths.
Be aware that the dye method demands essentially motionless water. This means you’ll need to turn off your pump, aerator, and remove your fish while you’re conducting the test.
Using the Leveling Method:
This is a tried-and-true method, and while it can be time consuming, it’s effective for relatively fast leaks, and it also works better if you’re facing a situation where there may be multiple leaks. You’ll need to remove your fish and aquatic plants to accomplish this, and since it may take a while to finish, make sure your holding tanks are aerated and kept in a shaded spot to protect the health of your fish. If this project ends up taking several days, plan for frequent water changes as well. This can be pretty inconvenient, but you’re going to remove your fish during repairs anyway, so try to keep the end goal in mind.
Start off by filling your pond to the maximum level and turn off your pump, filter, waterfall, and any other equipment that moves the water. Then wait. Take periodic measurements of your pond depth until it stabilizes. The deeper your leak, the longer this will take. It’s important to remember, as well, that this may not be the only leak.
Once your water level has stopped dropping, visually examine the perimeter of your pond at the new water level for damaged areas, small tears, or, if you can see them, pinholes. A bright flashlight will be helpful here. If you absolutely can’t find anything, you can add the dye or ping pong ball to get a more precise reading.
Since there can be multiple leaks at different depths, consider your options before proceeding. You’ll need to repair this leak before you can locate the next one, which means filling the pond completely and allowing the water to drop again. Rinse and repeat. Once you’ve finished and the water level does not drop more than is expected from normal evaporation, your repair is complete!
Using the Ping Pong Method:
This is a relatively new method that uses a combination of leveling and the principles of the pond dye method to find leaks. One major advantage is that a ping pong ball is that it is not only cheap, but it also leaves no questionable residue in the pond when you’re finished. You’ll still need to remove all fish and plants and turn off your equipment to ensure the water is perfectly still.
The idea is to place a ping pong ball on the surface of your pond while you’re allowing the water levels to drop and stabilize. If your pond is large or has a complex shape, feel free to drop three or four since they won’t interfere with each other. Ping pong balls float and are light enough that they’ll readily be carried along with the tiny current formed as water escapes through the leak. When the water loss stops and the ping pong ball has settled at a particular point along the wall, you can be fairly confident that the leak is nearby. However, since you won’t see dye exiting the pond, there will still be a bit of visual examination to pinpoint the exact location of the damage.
Just as with water leveling, this method can be repeated as needed until the water level is stable. If there are multiple problem areas, you’ll identify the deepest leaks first, finishing with the shallowest.
Leaks on the Pond Bottom
If your leak is on the very bottom of the pond, it presents a more complex problem. First, you’re likely to have damp soil or even standing water underneath the pond liner, which can signal the beginning of a number of problems. If your soil is dense clay, the water may not readily drain away, and you may be faced with bubbles, or blisters forming on the bottom of your pond where the escaped water is sitting. If your soil is particularly light, there could be concerns with erosion and soil instability, depending on how much water has drained from the pond over time. Either situation would require a complete removal of the pond so that structural repairs to the subgrade or removal of any collected water can be completed.
Evaluate Your Options
Once you’ve located the leak in your liner, take time to analyze what caused it. You may take into consideration the location and type of the leak—is it a tear, a puncture, or a series of pinholes? Does it look like the liner has cracked or crumbled, particularly the damage is present near the surface? Look at the overall condition of the liner—is it still flexible or has it become stiff and vulnerable to cracking? Does it appear to be discolored?
Once you’re able to characterize the problem area well, can you determine what caused it? Is it near a location where wildlife approaches the pond? What about humans? Is it an area that gets especially harsh scrubbing during cleanouts? Was there a recent accident where Uncle Bob stumbled along the edge of the pond while holding a screwdriver? Did a large tree branch fall into the pond during a recent storm?
It doesn’t make much sense to repair a liner without taking reasonable precautions that the damage won’t happen again. Installing a wooden overhang where kids and wildlife can safely step out and reach the water without disturbing the edge of the pond could be a great solution. Switching to a softer brush or compromising with acceptable levels of algae can mitigate further damage. Trimming dead branches from overhanging trees is always a good policy. (We’ll leave Uncle Bob to you.)
If the damage was serious or leaks were located near the floor of your pond, it’s worth considering whether you should simply replace the entire liner. After all, the damage you found could be part of a larger pattern that will continue to worsen. If your existing liner wasn’t particularly high quality or was vulnerable to ozone or UV rays and is showing signs of general degradation, this situation could be a sign of things to come. Finally, if you’ve already gotten many good years out of your existing liner and you’ve been hankering to make some upgrades, a complete renovation may be altogether simpler than facing the chore of having to completely empty your pond in order to locate and patch a hole, or even a series of holes.
Repairing your Pond Liner: Step by Step
Regardless of your liner material, once you’ve found the location of the leak and you’ve considered your long-term options, you can start the repairs. Any type of commercial pond liner can be repaired, but the materials and techniques will differ according to your liner’s specific makeup. We’ll discuss specific techniques for both RPE and EPDM liners and we have a few detailed instructional videos that demonstrate different types of repairs for different situations.
When you’re ready to repair your liner, start by removing your fish and plants. There will be quite a bit of activity and you don’t want either to be injured or damaged. Again, holding tanks and a shaded environment are the things that keep them healthy and happy.
Next, give yourself room to work. If your leak is on the pond wall, draw the water level down another 6-10 inches so you have a large enough dry surface to apply a patch. If the leak is located on the bottom of the pond, it needs to be completely drained and dry.
Regardless of which material you're working with, it’s better to have a flat, firm surface to support your patch and allow yourself to establish a tight seal. This can be a challenge when the liner is already in place, so get those creative juices flowing.
Once your patch area is dry, thoroughly clean the pond liner around the leak, several inches beyond where the patch will sit. You will rarely need to purchase any special kind of cleaner, though if you’re facing a heavy layer of algae, it may help to carefully apply some hydrogen peroxide to make it easier to remove. Large amounts of hydrogen peroxide could change the chemistry in your pond, though, so try to keep it to a minimum. Otherwise, dish soap or a solution of vinegar and tap water will do just fine. A soft brush can help remove any stubborn dirt as well.
Once your liner is clean, carefully remove grime and any traces of your cleaner, thoroughly rinse the area, and dry it completely.
All liner materials can use some type of adhesive to patch holes, while certain options, like RPE, can also use heat. The adhesives are not interchangeable, and some materials will only be further damaged by heat. It’s easy to purchase a pond liner repair kit online or at your local pond store. If you’re not sure what kind of pond liner you have, take a sample to your store and get an expert opinion rather than risk making the problem considerably worse.
AquaArmor RPE
RPE can be repaired using patches applied either with heat or adhesives, depending on what you’re comfortable with. When using adhesive, it is applied to both sides, and when all bubbles and gaps are rolled out, the adhesion is quite strong. Using heat to attach a patch is known as thermal welding and it changes the chemical structure of the polymers, binding the layers together irreversibly. Both methods require careful application, since gaps and air pockets will compromise the waterproof quality of the repair.
BTL Liners has produced some excellent informative videos demonstrating how to use either adhesive tape or a heat gun to repair both small and large holes in RPE liners. If a picture is worth 1000 words, then we’re estimating that these videos are probably worth 100,000 words!
AquaProFlex EPDM
EPDM should be repaired using adhesives. Heat is inappropriate since it will simply melt the material, not create a bond. We offer repair materials on our AquaProFlex page, but if you choose to buy a repair kit from a local hardware store, be sure it’s designed for fishponds and stay away from general purpose or even roofing patch kits. Just as EPDM is not designed for fishponds, it’s impossible to tell if the adhesives used for other EPDM applications are fish safe.
There are variations in repair kits, of course. Be sure to follow the instructions supplied with your particular kit.
The preparation steps for patching EPDM are the same described at the beginning of this section: drain the water, carefully clean the liner, and dry it completely, giving yourself plenty of room to work.
Use an EPDM patch from the repair kit and cut it into a circle or a square with rounded edges. Make sure the patch is large enough to have several inches of overlap with undamaged material to allow a secure grip. The rounded edges help discourage sharp corners from peeling up.
Apply primer to the area where the patch will be applied. Be sure to extend the primer beyond the edges of where the patch will be applied.
Allow the primer to set for a few minutes and then test it by touching the area with your finger, ensuring that the primer does not release, drawing out a string between your finger and the primed surface.
Install the self-adhesive patch by removing the backing and placing the patch over the damaged liner. If you’re applying a large patch, remove the backing paper a little at a time and roll the patch for good adhesion before you remove the next section of backing.
Once the patch is in place, use a roller to maximize adhesion, rolling out any bubbles or wrinkles. The patch should be rolled from the center outwards in all directions with stiff pressure, taking special care to ensure there are no loose edges.
Allow the patch to rest for several minutes while the adhesive sets before refilling your pond.
We’re Here to Help!
If you’ve made it this far, congratulations! You’re ready to get started. A pond is a beautiful, magical place to make memories, spend time outdoors, and commune with friends and family. Don’t let yourself be intimidated by a project that seems too large. No matter what you want to accomplish with your pond, BTL Liners can walk by your side every step of the way. Please use this resource as much and as often as you need, but don’t hesitate to give us a call if there’s anything we can expand on or explain.
