
Measure Smart, Not Hard: Simple Tips for Accurate Sizing
Before you even unroll your woven landscape fabric, taking accurate measurements of the area you want to cover is a crucial first step. Proper sizing ensures you have enough material to do the job right, minimizes waste, and avoids the frustration of coming up short. Here are a few simple tips to measure like a pro:
- Outline Your Area: Clearly define the boundaries of the garden bed, pathway, or slope you want to cover. You can use stakes and string or simply visualize the area.
- Measure Length and Width (or Distance): Using a measuring tape, measure the length and width for rectangular or square areas. For pathways, measure the total length. For irregular shapes, break the area down into smaller, more manageable rectangles or squares and measure each section.
- Add Overlap: If you’re using multiple pieces of fabric, remember to factor in an overlap of at least 6-12 inches. This prevents weeds from growing through the seams.
- Consider Extra for Anchoring: It’s also a good idea to add a little extra fabric (a few inches on each side) for anchoring purposes, especially on slopes or around the edges of beds. This gives you some wiggle room during installation.
- Note Your Measurements: Write down your measurements clearly to avoid mistakes when ordering or cutting your fabric. It’s always better to have slightly more than not enough!
Pro Tip: You’ll have a smoother and more effective installation process if you take a few extra moments to measure accurately.
Choosing the Right Roll for Your Project
Woven landscape fabric is available in various widths and lengths. When selecting your roll, consider the dimensions you measured in the previous step. Wider rolls can cover larger areas with fewer seams, saving you time and effort. However, they can also be more cumbersome to handle, especially for solo gardeners. For smaller beds or pathways, narrower rolls might be more manageable.
Pro Tip: Think about the size and shape of your project and choose a roll that minimizes waste and is easy for you to work with.
Prepping Your Space for Success
Like preparing a canvas before painting, properly prepping your garden area supports a successful landscape fabric installation. This step ensures good contact between the fabric and the soil and removes obstacles that could compromise its effectiveness:
- Clear Debris: Remove all weeds, rocks, sticks, and other debris from the soil surface. Pay particular attention to removing the roots of persistent weeds.
- Level the Soil: Rake the area to create a relatively smooth and even surface. This will help the fabric lay flat and prevent air pockets.
- Amend the Soil (If Necessary): If you plan to incorporate compost or other soil amendments, do so before laying the fabric. Water the area lightly after amending to settle the soil.
Pro Tip: A well-prepared surface will result in a more effective and longer-lasting weed barrier.
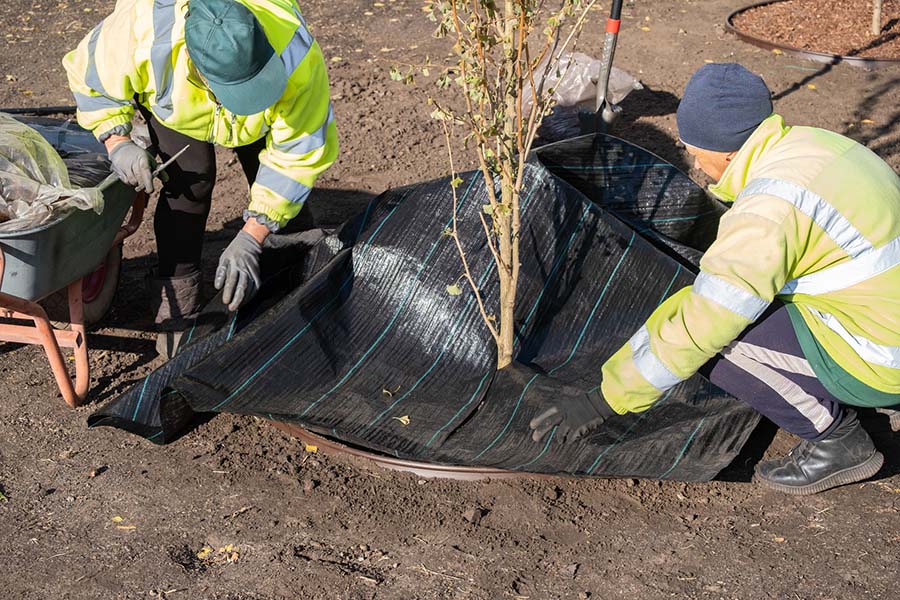
Laying and Securing the Fabric: Best Practices.
Now for the main event: laying and securing your woven landscape fabric. Here are some best practices to ensure a snug and effective installation:
- Unroll Carefully: Unroll the fabric over your prepared area, being mindful of any plants you need to work around.
- Overlap Seams: If using multiple pieces, overlap the edges by at least 6-12 inches.
- Pull Taut: Gently pull the fabric taut as you go to minimize wrinkles and bunching, but avoid stretching it excessively.
- Secure with Staples: Use garden staples to firmly secure the fabric to the ground. Space the staples every 12-18 inches along the edges and every 18-24 inches across the body of the fabric.
Pro Tip: Pay extra attention to securing overlaps and areas around the perimeter.
Cutting and Finishing for a Professional Look
Once the fabric is laid and secured, you’ll need to make cuts for your existing or new plants and trim any excess fabric for a neat appearance:
- Locate Planting Spots: Identify where your plants will go.
- Make Precise Cuts: Use sharp scissors or a utility knife to cut an ‘X’ or a circular opening in the fabric that is just large enough for the plant’s base. Avoid making the holes too big, as this will create opportunities for weeds to emerge. Take a look at the instructions below for treating cut edges.
- Fold-Back Edges (Optional): For a neat and orderly border, fold under excess fabric along the edges of your garden beds or pathways and secure it with extra staples.
- Trim Excess Fabric: Trim using sharp scissors or a utility knife. Apply heat to prevent fraying.
Pro Tip: Taking the time to cut neatly and finish the edges will improve the aesthetics of your garden and the effectiveness of your weed barrier over the long term.
Try This: Preventing Fraying with Heat
A common issue with cut edges of woven landscape fabric is fraying. Here’s a simple way to minimize this using heat:
- Gather Supplies: You’ll need a small scrap of woven landscape fabric and a heat source. A lighter held a short distance away, or the low setting of a heat gun can work (exercise caution when using heat).
- Experiment on a Scrap: Take your scrap piece and carefully apply heat to a cut edge for a brief moment (a second or two). Observe how the heat causes the woven strands to slightly melt and fuse together.
- Vary the Time: Try applying heat on different parts of the scrap edge for slightly longer periods, noting how the fusion changes. The goal is to gently melt the edges just enough to bond the strands without burning or significantly distorting the fabric.
- Apply to Installed Fabric (Carefully): Once you have a feel for the right amount of heat and time on your scrap, you can carefully apply the same technique to the cut edges of the woven landscape fabric you’ve installed in your garden, especially around plant openings or trimmed borders. This will help prevent the edges from unraveling over time.
Pro Tip: Exercise extreme caution when working with heat sources. Keep the heat moving and avoid prolonged exposure to prevent damage to the fabric or injury to yourself. Always test on a small, inconspicuous scrap first.
Looking Ahead
With your woven landscape fabric properly measured and expertly installed, you’re well on your way to a lower-maintenance and more beautiful garden. But that’s not all it can do! The next chapter will describe some innovative ways you can use woven geotextiles to create healthier raised beds, manage soil temperature, and even tackle larger landscaping projects.
