
The average hobby setup for insect breeding features what we call “Generational Soup.” Looking into a bin, you’ll see adults chirping, females laying eggs, and pinhead babies running around—all in the same container. It feels successful; it looks like a thriving ecosystem. But for a commercial farm, that bin spells disaster.
The Soup of Chaos
If you have mixed generations in one bin, how do you harvest? You can’t dump the bin into a harvester because the adults will be mixed with thousands of unmarketable babies. You can’t sift them easily without crushing the fragile nymphs. This leaves you trying to hand-pick your product, which destroys your labor efficiency. Not to put too fine a point on it, but you can’t fulfill a 500 lb order if you have to hand-pick adults out of a bin full of babies.
Shifting to Batch Production
To operate at scale, you need to establish strict batch management.
- Week 1: Eggs are laid.
- Week 2: Adults are removed. The bin contains only babies of the exact same age.
- Week 6: The entire bin reaches maturity on the exact same day. You harvest 100% of the bin at once. You wash the bin. You sanitize the room. You start over.
The Weekly Rhythm
This routine preserves your sanity as much as your efficiency. Realistically, if your insects are breeding continuously in every bin, you’re going to be working 7 days a week just putting out fires. With a synchronized colony, you’ll follow a schedule where Monday is Breeding, Tuesday is Harvest, and Friday is Cleaning. Like any successful business professional, you’ll have a calendar to follow and a schedule you can trust.
The Lot System: All-In, All-Out
In the “soup of chaos” model, a bin is essentially a permanent residence where adults keep laying new eggs, which then grow up in the same container to replace the ones you’ve harvested. The bin never empties; it just keeps churning mixed generations. Aside from being inefficient, this chaos can cause some serious problems (see Chapter 5).
In the batch model, you treat your insects more like distinct version releases: Lot 001, Lot 002, Lot 003. This follows the agricultural principle of All-In, All-Out. You fill a specific zone (an entire room, or a dedicated aisle in your warehouse) with eggs on Monday and close it. You don’t add new insects to it. Six weeks later, you can harvest the entire lot, clean it down to the concrete, and start again.
But for batching to work, breeding needs to be decoupled from growing.
Days 1–7: The Breeding Box
Place your adult beetles or crickets in high-density breeding trays with egg-laying substrate. Their job is straightforward: lay eggs.
Day 8: Incubation
Remove the adults. The adults go back to the breeding pool (or are processed). The egg trays—and only the egg trays—are moved to the nursery zone for grow out.
Weeks 2-6: Grow Out
The eggs hatch. But because they were all laid within the same 7-day window, every insect in that lot is roughly the same size. They molt together. They grow together.
Week 6/7: Harvest
Once the first few insects in the nursery start to show wings (maturity), it’s time to harvest the entire lot.
Advantages on All Levels
Feed Efficiency & Air Quality
Babies need high protein (20%+) for growth, while adults need lower protein (16%) for maintenance. If you feed high protein to adults, they excrete excess nitrogen, causing massive ammonia spikes that can crash your colony. Batching allows you to lower the protein (and the smell) exactly when the insects reach adulthood.
Uniform Size
Consistency is king, whether you’re selling to a distributor or processing into powder. Batching guarantees that every cricket in the bin is the same size.
The Weekly Rhythm: Sanity via Scheduling
The most common reason insect farmers quit isn’t a market crash—it’s burnout. If you run a chaotic soup system, you’ll end up working 7 days a week, managing chaos.
A batch system grants you the superpower of prediction. You can establish a weekly rhythm that concentrates specific tasks on specific, predictable days, and when you’re operating on a commercial scale, that’s golden.
The Staggered Start
If you have a 6-week grow cycle, don’t start all your bins at once! (You’d have nothing to sell for 5 weeks) Instead, stagger them a week apart:
Week 1: Fill Zone A
Week 2: Fill Zone B
[...Weeks 3-5 continue…]
Week 6: Fill Zone F
The genius here is that by Week 7, Zone A is ready to harvest. By Week 8, Zone B is ready. You’re still managing strict batches, but now you have a continuous weekly supply.
The Tuesday Harvest
In a synchronized farm, your week should look so predictable that it’s almost boring. (Hey, boring is safe, no?)
Monday (Breeding Day)
Set up new egg-laying trays. Move hatched pinheads to the nursery.
Tuesday (Harvest Day)
Empty the mature Zone. Process the insects. Pack orders.
Wednesday (Shipping Day)
Get the product out the door.
Thursday (Maintenance)
Check hydration lines, repair screens, and mix feed.
Friday (Deep Clean)
Scrub the empty Zone down to the concrete so it’s ready for the next rotation.
The Weekend
Yes, you read that right: You actually get to take it off!
The 80/20 Rule of Labor
In this model, 80% of your physical labor happens on Tuesday (Harvest) and Friday (Cleaning). Since the other days are just monitoring, you can make the most of your part-time labor. You don’t need a full-time employee; just a “Tuesday Guy” to help with the heavy lifting.
Density Management (or) The Greed Trap
Once you have your batches and schedule running, you will face a temptation that ruins more farms than disease: Overcrowding.
It seems logical: I have empty space in this bin. Why not squeeze in a few more eggs? More bugs=more money, right?
Sorry, no. In insect farming, Less is More.
The Physics of the Heat Ball
Being cold-blooded, a single cricket isn’t going to register on your thermometer, but a pile of 10,000 crickets will generate a massive amount of metabolic heat. In an overcrowded bin, the center of the colony can reach 110°F+ even if your room is set to 85°F. That’s as devastating for your insects as it would be for you.
In simple terms, the insects trapped in the middle of a heat ball die or stunt. Those on the edges survive, but they’re stressed, and their growth is slowed.
This means your job is to manage airflow, not just floor space. If heat can’t escape the center of the cluster, you’re going to lose the bin.
Managing the Space for the Species
To prevent a heat-ball disaster, you need to manage the space based on how the species moves.
For Climbers (Crickets)
In the grow-out phase, nymphs don’t fly—they crawl. A 20-gallon tote has very little floor space, but don’t despair! If you fill it vertically with egg flats (cardboard cartons), you’ll increase the habitable surface area by an impressive 800%. Critical Note: Stack the cardboard vertically (like books on a shelf) so hot air can rise and escape.
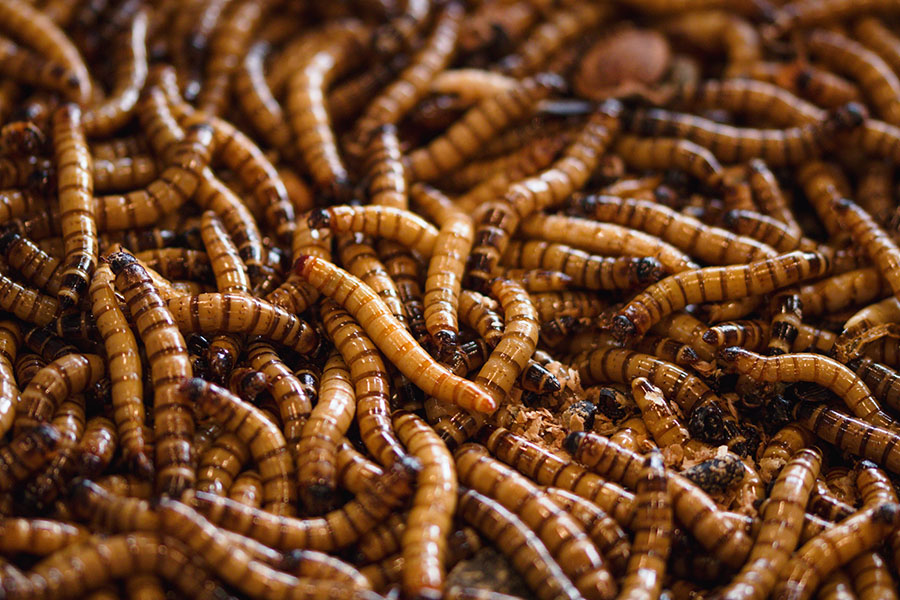
For Burrowers (Mealworms/BSF)
These larvae live in the substrate, so vertical cardboard does nothing for them. The hard density limit here is substrate depth. If the bran or frass layer is more than 2–3 inches deep, the heat gets trapped at the bottom, and the larvae will cook.
To scale your burrower production, use more bins, not deeper ones. High-density mealworm farming relies on racking systems holding hundreds of shallow trays, not large, deep tubs.
Don’t Guess—Weigh
So how can you maximize density without overcrowding? Stop guessing. Never “sprinkle” eggs into a bin. Establish a standard and weigh your eggs using a sensitive gram scale.
Determining Your Standard
You’ll need to run a few test batches to find the perfect density for your climate and bin size, but there’s no reason to start blind. Use industry baselines as your starting point for a standard 20-gallon tote or tray:
- Crickets: Aim for 2,500–3,000 finished adults per tote.
- If your hatch rate is 80%, you need ~3,500 eggs. If 1 gram of eggs = ~3,000 eggs (check your supplier’s count), you start with 1.2 grams of eggs per bin.
- Mealworms: Aim for 1 lb of harvest per square foot of tray surface area.
- Black Soldier Fly (BSF): These guys are the Heat Kings of the insect world, and they’re tiny (1 gram of eggs contains nearly 30,000 larvae). Please, do NOT put a whole gram into a single tote! Start with 0.15 grams of eggs per square foot of growing surface. This yields a safe but dense harvest (approximately 2-3 lbs wet weight) without overheating the colony.
The Optimization Loop
Once you harvest your first batch, look at the results:
- Are the insects small? If the answer is yes, they’re overcrowded. Reduce the egg weight by 10% in your next batch.
- Is the bin cool and the bugs huge? You understocked. Increase the egg weight by 10% next time.
The Goal
In each of these cases, your goal is the highest total harvest weight per bin before the individual insect size starts to drop.

