
Introduction: The 90% Rule
If you ask a novice pond owner how liners spring leaks, they’ll usually mention punctures, then describe a sharp rock poking through the middle of the sheet. But if you ask a veteran pond builder where leaks most often appear, their answer is different.
In the vast majority of cases—some estimates put it as high as 90%—the leak doesn't occur in the pristine middle of the sheet. It happens at the intersections: where two sheets meet (a seam) or where a pipe passes through (a penetration).
This misdirected anxiety often leads first-time builders to make questionable choices. For example, they may avoid installing bottom drains because they don’t want to risk cutting a hole in their waterproof shell. But in pond engineering, a hole isn't a leak if it is mechanically sealed. In the same manner, a seam isn't a risk if it is chemically fused.
It’s time to move from fear to physics.
The Seam Trap (Adhesion vs. Fusion)
The most common failure point in any pond is a field seam. Trying to join two pieces of material together in a muddy excavation is difficult under the best conditions, but the material you choose dictates whether that bond is permanent or temporary.
The Chemical Bond (EPDM & Tape)
Because EPDM rubber is a thermoset material (vulcanized), it doesn’t melt, meaning it can’t be heat welded. To join two sheets, you must rely on a chemical bond using double-sided splice tape and primer.
The Problem
No matter how professionally applied, tape is essentially a glorified sticker. After years underwater, the adhesive can degrade. Worse, because EPDM has "memory," the two sheets are constantly pulling against the tape as they expand and contract. Eventually, the mechanical stress wins, and the seam creeps open.
The Molecular Bond (RPE & HDPE)
Thermoplastics like RPE and HDPE function differently. They are heat-weldable. When these materials are joined in the factory (or by a pro in the field), they’re fused rather than glued. Heat is applied until the plastic melts, and the two sheets are pressed together to become a single, continuous piece of material.
The Result
There is no adhesive to fail and no tape to pull apart. In fact, the molecular bond created by the heat weld is often stronger than the liner itself.
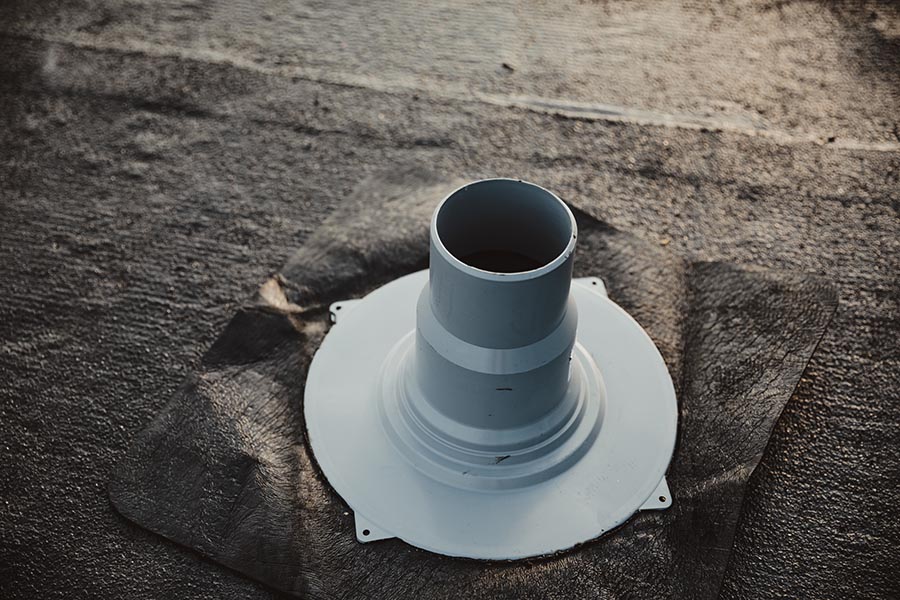
The Penetration Fear: Bottom Drains
For a new pond builder, perhaps the most stressful moment is installing a bottom drain. After all, it feels counterintuitive to take your perfectly pristine liner and deliberately cut a four-inch hole in its bottom. But in pond engineering, a hole is only a risk if it’s unmanaged, and bottom drains don’t rely on luck; they rely on mechanical compression.
The Sandwich Principle
A bottom drain assembly works like a compressed sandwich. (You know, the ones with those fancy toothpicks in them?)
On the bottom, you have the drain flange bolted to the pipe. On top, you have the rigid faceplate. Those are your bread slices. Squished (held securely) between them is your liner (the meat).
When you tighten the stainless steel bolts (fancy toothpicks), you’re squishing the liner between two hard plastic surfaces. This creates a tight seal that water pressure can’t overcome.
The Silicone Myth
This brings us to a critical distinction: Silicone is not the glue. Many DIYers mistakenly believe that the silicone holds the drain in place. It doesn’t. In fact, the silicone’s only function is to be a gasket. It fills the microscopic imperfections in the plastic flange, preventing water from migrating through the threads.
The drain’s watertight integrity comes entirely from the torque of the bolts compressing the liner. As long as the flange is flat and the bolts are tight, the drain becomes a permanent, integral part of the liner system.
Pipe Penetrations: Boots vs. Bulkheads
While a bottom drain is a standard install, many ponds require pipes to enter through the sidewalls for returns, skimmers, or intake jets. How you seal these depends entirely on the surface you are penetrating.
The Wrong Way (The “Caulk & Pray”)
The most common beginner mistake is cutting a slit in the liner, shoving a PVC pipe through, and slathering the gap with silicone. Yes, it’s quick and easy, but it’s also a guaranteed failure. PVC vibrates with water flow, and the liner expands with temperature, and eventually, that movement will tear the silicone bond. You need a seal that moves with the liner or clamps onto it.
The Bulkhead (For Flat Surfaces)
If you’re attaching your liner to a rigid, flat surface—like a plastic skimmer box or a filter vault—use a bulkhead fitting. The bulkhead relies on compression, just as the bottom drain does. In this case, a large nut tightens a gasket against the flat wall, sandwiching the liner.
The Rule
Bulkheads only work on flat surfaces. If you try to install a bulkhead on a curved rock shelf or a wrinkled corner, it will leak.
The Pipe Boot (For Curved/Free Surfaces)
If you need to bring a pipe through the liner in the middle of a curved wall or a stream bed, you can’t use a bulkhead. You need a Pipe Boot. A pipe boot looks like a rubber top hat. The wide brim is a flexible flange, while the pipe passes through the chimney.
The Advantage
Because the flange is soft (made of EPDM or RPE), it conforms to the curves of the pond floor. Seal the flange to the liner (using tape or heat) and clamp the chimney to the pipe with a stainless steel band. This allows the pipe to vibrate and shift without breaking the watertight seal.
The One-Piece Strategy
The ultimate solution to seam failure is simple: don’t have seams.
In the old days, you were often forced to buy standard liner rolls (e.g., 20’ wide) and splice them together to fit your pond. Today, you can technically purchase massive rolls of either material, but the logistics are vastly different.
Custom Fabrication (RPE)
RPE is a lightweight thermoplastic. Because it weighs roughly 1/3 as much as rubber, suppliers can factory-weld enormous single panels (up to 60,000 sq ft) that are still manageable for a DIY crew to deploy. This means a good supplier can fabricate and ship a 50’ x 100’ liner that arrives as a single, accordion-folded piece with zero field seams.
The Weight Limit (EPDM)
While you can buy EPDM in “Jumbo Rolls” (e.g., 50’ wide), be careful. A 50’ x 50’ sheet of 45-mil EPDM weighs over 700 lbs. These rolls must be delivered via semi-truck and require a forklift to unload. Unless you have heavy machinery in your backyard, a seamless EPDM liner of this size is effectively impossible to install.
Most EPDM builders are forced to buy smaller, lighter rolls (20’ wide) and accept the risk of taping seams in the field simply to make the material movable.
The Verdict: If your pond is large, RPE is often the only way to achieve a truly seamless installation without industrial equipment.
A Note From the Trenches:
There is a reason professional builders dread seams. If a solid sheet leaks, it is usually a distinct puncture that you can find with a visual inspection. But a seam leak is insidious. Water can enter a failing tape seam at one point, travel ten feet inside the overlap, and exit somewhere else. Essentially, you’re looking for a microscopic failure in adhesion hidden under six inches of black rubber tape. It is the proverbial needle in a haystack. If you can avoid a field seam, do it.

