
The installation work we just covered in Chapters 6 and 7 is only one side of the coin. The indispensable other side is Construction Quality Assurance (CQA)—the continuous process of testing and inspection that proves the work meets specification as it progresses.
Let’s be perfectly clear: CQA does NOT follow installation. It’s a parallel effort with every panel deployment and every foot of field seam, designed to eliminate even the possibility of catastrophic error.
It only makes sense: top surgical teams don’t rely on skill and experience alone; they follow rigorous protocols for everything, from monitoring vitals to counting sponges, double- and triple-checking at every step because it’s too late to do a tool inventory after the patient is in the recovery room.
While we realize that installing a pumped storage liner isn’t exactly open-heart surgery, the potential consequences of failure are serious and demand a similar standard of verification. Without it, all the careful planning, material science, and installation skills you’ve harnessed for this project are essentially meaningless.
For PSH reservoirs, leaks are the boogeyman—not sponges. So we’ll cover the two main types of field seam testing—non-destructive and destructive—and the final visual inspection that gives the green light to “close it up” by placing the protective cover structure.
The CQA Plan: Your Verification Blueprint
By now, we’ve agreed that CQA is just as critical on the construction site as in the operating room. But CQA isn’t just a mindset, and it doesn’t happen just because you’re thinking about doing a good job. Real CQA needs a plan of action that’s agreed upon before anyone starts laying out the liner. The CQA Plan spells out who does what, how the testing gets done, and what the paperwork needs to look like. It’s the document that keeps everyone honest and ensures the finished product actually meets the specs.
So, what goes into a solid CQA Plan?
Who’s Who
The plan should name names. Who’s the lead CQA engineer? Who are the field inspectors making the calls? What authority do they have compared to the installation foreman? Get the chain of command clear from the start.
The Testing Regimen
What tests are you running on the seams? Air channel tests? Vacuum box? Destructive peels and shears? How often? Every 500 feet? One test per welder per day? Spell it out so there’s no confusion.
The Paper Trail
How is all this getting documented? Daily reports? Photos? Test logs signed off? You’ll need proof that the work was checked and passed. This isn’t just for your peace of mind; it’s often required for final sign-off.
Handling Screw-Ups
What happens when a test fails or someone spots a defect? The plan should establish a straightforward process: How do you mark it? What’s the approved repair method? How do you re-test the fix? Plan for problems, and they become manageable bumps, not project-killing crises.
Write your plan down, circulate it, and have the owner, engineer, installer, and CQA team sign off on it before the first panel is unrolled. It sets the standard and prevents a whole lot of headaches down the line.
Okay, let's get into the first part of the verification process: Non-Destructive Testing (NDT). This is your frontline defense for checking every single foot of field seam without having to cut holes in your brand new liner.
Non-Destructive Testing (NDT): Checking Every Inch
The goal of Non-Destructive Testing is simple: verify the continuity and integrity of 100% of your field seams without damaging the liner itself. Depending on the type of weld, you can choose from two standard methods.
Air Channel Testing (ASTM D5820)
Air channel testing is the standard test for dual-track fusion welds produced by a wedge welder. In fact, the air channel between the two weld tracks is formed specifically for this test.
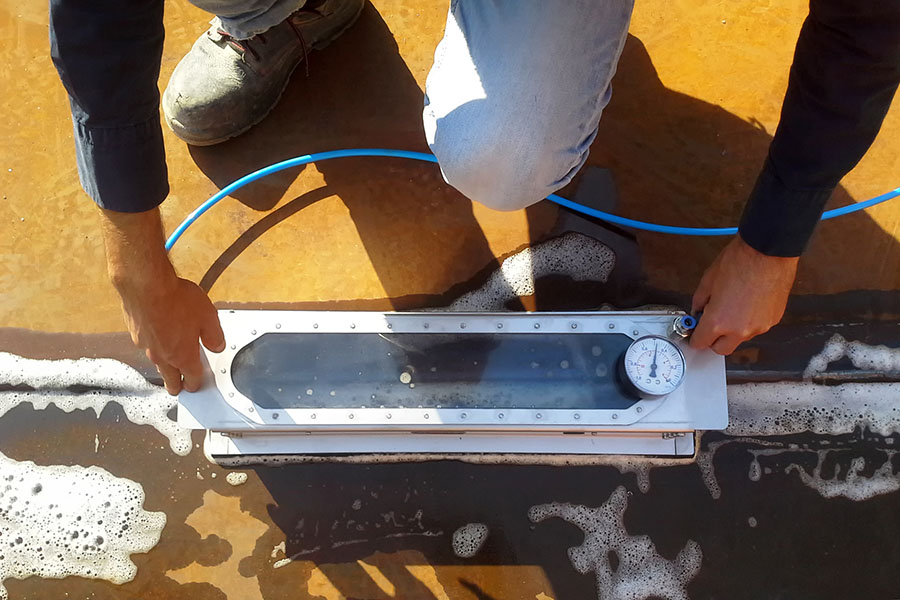
How it Works
The technician begins by sealing both ends of a section of the air channel (typically 300-500 feet long). Next, they insert a needle connected to an air pump with a pressure gauge into one end. The channel is inflated to a specified pressure (often around 30 PSI, but check your project specs) and held for a set period (usually 5 minutes).
What it Tells You
If the pressure holds steady (allowing for a small, specified drop due to temperature changes), it proves that both weld tracks are continuous and leak-free for that entire section. If the pressure drops significantly, it means there’s a leak somewhere in that run, and the crew needs to find and repair it.
Pros
Fast, efficient, and tests the full length of the weld section simultaneously.
Cons
Only works on dual-track fusion welds. Doesn’t pinpoint the exact location of a leak within the tested section.
Vacuum Box Testing (ASTM D5641)
Vacuum box testing is used on extrusion welds (patches, details, and penetrations) and any single-track fusion welds.
How it Works
The technician sprays a soapy water solution over a small section of the extrusion weld, then places a clear-bottomed box (the “vacuum box”) over the soapy area. The box has a soft rubber gasket around the bottom edge to create a seal against the liner. Air is pumped out of the box, creating a vacuum.
What it Tells You
If there’s a pinhole or discontinuity in the weld, the vacuum will suck air through it from underneath the liner, creating bubbles in the soapy water that are clearly visible through the box. No bubbles mean a good seal.
Pros
Can test any type of weld. Pinpoints the exact location of a leak.
Cons
Much slower than air channel testing, as it only tests a small area (the size of the box) at a time. Requires careful operator attention to ensure the box is well sealed over the weld and to spot any bubbles.
These NDT methods are direct visual tests providing real-time verification that the welds are continuous and leak-free before you move on to the next step. As-you-go testing is fundamental to CQA practices.
Destructive Testing (DT): The Moment of Truth
Now we need to talk about the part of CQA that everyone hates but is absolutely necessary: cutting holes in your brand-new liner. Deep breaths!
Non-destructive tests are great for confirming continuity—that is, that there are no pinholes in the seam. But they don’t tell you anything about the strength of the weld itself. For that, you have to cut out a sample and try to rip it apart. It’s the only way to prove your welding parameters are producing a bond that’s as strong as the liner itself.
The “How and When”
Fortunately, destructive testing doesn’t mean randomly slashing bits off your liner and ripping them apart. It’s a calculated procedure defined in your CQA Plan.
Frequency
The standard frequency is to take one destructive sample (or “destruct”) per 500 feet of seam. At a minimum, you’ll take one sample per welding machine, per operator, per day.
Procedure
The CQA inspector will cut a coupon (typically 12 inches wide by 3-4 feet long) directly from the field seam, which is cut into multiple specimens for testing.
Patching the Hole
Obviously, this leaves a hole in your liner. Patch the hole immediately with an extrusion weld, which must then be 100% non-destructively tested (with a vacuum box) by the CQA inspector. Take note: This entire process must be documented.
The Tests: Peel and Shear
The specimens cut from the sample coupon are subjected to two tests using a portable tensiometer. These tests are performed on-site.
Peel Test (ASTM D6392)
The peel test verifies the bond between the two sheets. The tensiometer holds a specimen in its jaws and pulls the two “flaps” of the seam apart in a “T” shape. You’re looking for what’s called a Film Tear Bond (FTB). This is the ideal result: the weld itself holds, and the liner’s parent material tears next to the weld. This proves the weld is stronger than the sheet.
Shear Test (ASTM D6392)
This tests the weld's overall strength in the same direction as the liner. The sample is clamped and pulled along its length until it breaks. Again, you are looking for the parent material to fail before the weld itself.
If these samples pass the peel and shear tests right there in the field, you can have a high degree of confidence that your crew’s welding procedures are dialed in correctly for the site conditions.
The Final Walk-Through: Inch by Inch
Once all your seam testing is complete and every patch has been non-destructively tested and documented, it’s time for the final walk-through. This is your last chance to catch any minor damage or overlooked details while the liner is still fully exposed. You might compare it to the final punch list walk-through on a building project. Together, you and the CQA inspector will walk every square foot of that liner with a critical eye, looking for anything and everything that’s less than perfect.
Surface Condition
Are there any scratches, scuffs, or areas of excessive abrasion from foot traffic or equipment? Are there any wrinkles or “blisters” (bridging) that indicate the liner isn’t lying flat against the subgrade?
Seam Appearance
Examine every inch of field seam for inconsistencies, burn-throughs, or areas that don’t look properly fused, no matter how small.
Patches and Repairs
Double-check every patch applied over a destructive test location or a previous repair. Is the extrusion weld sound all the way around? Is the NDT documentation for that specific patch complete and signed off?
Penetration Details
Carefully examine every pipe boot, batten strip seal, and corner. Ensure they are lying flat, properly sealed, and show no signs of stress or pulling.
General Debris
This is the final cleanup. Remove every stray tool, rock, loose soil clump, or piece of trash from the liner surface. Anything left behind can become a puncture threat when you place the cover layer.
The walk-through is your final hurdle. This is the moment when the installer, the engineer, and the CQA team all look at the finished work and agree: “This is a clean, sound, and complete installation.” Only after that sign-off are you ready to give the green light and begin placing the protective cover.

