
For every farmer breaking ground on a brand-new hoop house today, there are likely ten others (Perhaps you’re one of them?) staring at an old machinery shed or a dark pole barn, wondering, “Can I make this work?”
The answer is usually yes, and simple economics provides a convincing weight on your side of the scale. After all, the most expensive parts of a building—the site prep, the heavy timber posts, the trusses, and the roofing—are already standing. Renovating an existing structure lets you expand your livestock capacity for a fraction of the cost (and time) of a new build. But there is a hitch: these older buildings were usually designed for tractors or hay, not live animals.
The Dungeon Problem
Most older pole barns are built like vaults: metal siding runs all the way from the roofline to the dirt. It’s an excellent design for an equipment shed, but the pitch-black and stagnant interior is disastrous for livestock. Without airflow, ammonia levels spike, humidity rots the bedding (and eventually the posts), and pathogens thrive.
The good news is, you don’t need to tear it down and build a greenhouse. Turning that old shed into a healthy livestock environment requires little more than some (judicious) surgical demolition. Cutting open the sidewalls and installing some well-placed agricultural curtains will quickly convert that old shed into a bright, airy livestock pavilion at a fraction of the cost of a new build.
Safety First: That Skin is Structural
Before powering up your saw, take time to understand exactly how your barn stands up.
In many pole barns, the metal siding provides shear strength (or racking resistance). In other words, it’s the metal skin that keeps the building from leaning over when the wind hits it. If you remove a 4-foot strip of metal along the length of the building, you’ve compromised that diagonal bracing, and that spells trouble.
So before you even pull out your power equipment, inspect the posts. If they’re showing rot at the ground level, do not cut the metal; that siding might be the only thing holding the barn up. If that’s the case, you’ll need to install new diagonal lumber bracing in the corners or along the upper truss line to replace the stability you are removing with the metal.
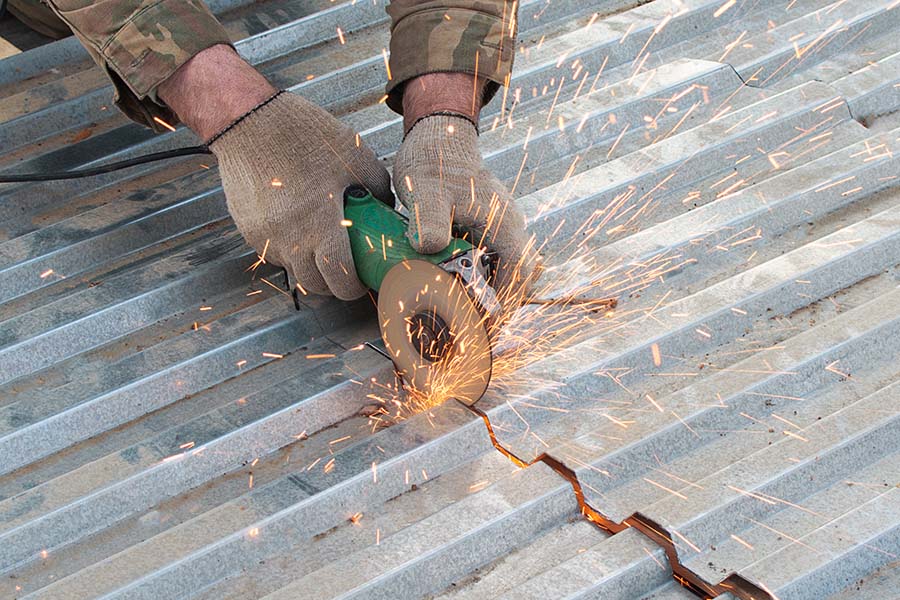
Step 1: The Cut Line
Once you’ve taken care of any necessary bracing, it’s time to decide where to cut. How much you’ll want to open depends on your climate and your animals, but a common standard is a 4- to 6-foot-high opening running the length of the sidewall. Start by snapping two chalk lines across the full length of the building—one for the top cut and one for the bottom—directly onto the metal siding.
Pro Tip: Don’t just measure up from the ground at each post. Dirt floors are rarely flat, and old barns settle unevenly. Instead, use a laser level to keep your height consistent (regardless of what the ground is doing) and snap your chalk line between these points.
Use a circular saw with a metal-cutting blade or an angle grinder with a cutting wheel for the cleanest cut. (And don’t forget those safety glasses and ear protection—cutting sheet metal is loud and throws hot sparks.)
Step 2: The Frame
Once the old metal skin is removed, you’re left with an open gap between your posts. You’ll immediately appreciate the fresh light and air, but you still need to build a frame to hold your curtain system.
Start by installing a header (usually a treated 2x6 or 2x8) horizontally between the posts at the top of your opening. This gives you a solid backing to screw your curtain track or clips into, and it sandwiches the loose bottom edge of the remaining siding to prevent it from flapping in the wind. On the same principle, install a sill board or a kneewall at the bottom of the new opening. This protects the cut edge of the lower metal and gives the curtain a smooth, flat surface to seal against when it’s closed.
Step 3: Dealing with Pole Spacing
New construction usually has perfect 8-foot or 10-foot spacing, but old barns (depending on their age) are rarely that consistent. You might even find posts spaced at 7 feet, then 9 feet, then 8 feet.
Do yourself a favor and don’t try to force the curtain system to match these irregularities. Instead, install your horizontal headers and sills to create a continuous, flush surface. If you do that, the curtain system can mount to these horizontal boards, spanning across the odd spacing of the vertical posts without issue.
The Payoff: New Life in an Old Shell
By the time you put down the saw, you’ll likely be covered in metal dust and ready for a shower! But take just a moment to step back and look at what you’ve achieved.
To family and friends, it may look like you haven’t done much more than cut a few holes in a wall, but don’t let them kid you—you’ve actually unlocked thousands of dollars in value by transforming a dark, depreciating storage shed into a productive asset. You saved the time and hassle of taking out loans, dealing with a muddy job site, and you’ve saved the cost of the trusses, the posts, the roof, and the site prep—all for the price of a few headers and some sweat equity. Good Job!
One Final Check
Before you install your curtains and bed down the barn for your first group of animals, run through this quick livestock readiness checklist:
The Sharpness Test: Metal cutting leaves razor-sharp edges. Walk the entire length of your new opening and run a gloved hand (or a grinder) over the cut edges. If it can snag your glove, it can slice an animal’s nose.
The Water Lines: Now that the barn is open to the air, your old plumbing might be more exposed to freezing than before. We’ll talk about managing severe weather in the next chapter, but keep it in mind as you plan your interior layout.
The Light Check: Stand in the center of the barn with the lights off. The difference in brightness should be shocking. That natural light isn’t just for looks; it’s the best disinfectant you can buy.
