
Before construction begins, let's talk about where pumped-storage hydropower projects go wrong. More often than not, it's not the reservoir liner that fails; it's the foundation it was built on. A liner is a barrier, not a structural bridge—it can’t fix an unstable or poorly prepared subgrade. This chapter covers the most critical and least glamorous part of the job: the groundwork. Get this part right, and everything else that follows is easier.
We’ll cover the critical civil and geotechnical work that happens well before the primary RPE liner is deployed. This includes the initial site assessment, strict standards for preparing the final subgrade, and the function of the underlying geosynthetic layers—like the Geosynthetic Clay Liner (GCL)—that form the complete system.
The Geotechnical Investigation: Know Your Ground
Inevitably, the most expensive surprises on any large earthmoving project are hiding underground. So before you finalize any design, you need to conduct a thorough geotechnical investigation of the proposed reservoir site. This extra step reduces the likelihood of discovering a fatal flaw after you’ve already started construction.
Start by hiring a specialist firm to drill a series of boreholes and dig test pits across the reservoir footprint to analyze the subsurface conditions. The resulting geotechnical report will become the foundation for your entire design. It will tell you:
Soil Stratigraphy
What are you actually building on? Is it solid bedrock, dense clay, or layers of sand and gravel?
Groundwater Level
The report will identify the location of the seasonal high water table, which is critical for designing an effective sub-liner drainage system.
Soil Properties
It provides the critical engineering data—like shear strength and bearing capacity—needed for stable slope and berm design.
Deleterious Materials
It will identify any "problem" materials that you need to remove, such as large, angular rocks or highly organic soils.
Don't skip this step. The money you spend on a good geotechnical investigation is the best investment you'll make on the entire project.
Subgrade Preparation
Liner failure due to a poorly prepared subgrade is an entirely preventable mistake. As we all know, a flexible liner can’t stand on its own—it’ll conform to whatever surface it’s placed on. Your job is to create a supportive foundation that is smooth, firm, and free of anything that could damage the liner.
Stripping and Rough Grading
Begin by stripping and grubbing the entire reservoir footprint. Remove all vegetation, topsoil, stumps, roots, and rocks larger than a golf ball. If your geotechnical report identified any pockets of unsuitable material (like highly organic soil or sharp, angular rock), over-excavate those areas and replace them with approved, compacted fill.
Installing the Sub-Liner Drainage System
Once the reservoir is graded to its rough shape, the next critical step is to install the sub-liner drainage system. Its sole purpose is to capture and remove the groundwater that can build up in the subgrade, providing a permanent defense against the powerful uplift forces that occur during a rapid drawdown. This is your “active defense” system.
The Design: A Herringbone Network
The most common and practical design is a herringbone pattern of drainage trenches. A main central trench runs down the primary slope of the reservoir floor, leading directly to a collection sump or a daylight pipe outlet. Smaller lateral trenches then branch off this main line at 45-degree angles, spaced from 50 to 200 feet apart, depending on the anticipated groundwater volume (as determined by your geotechnical report). This pattern ensures comprehensive coverage of the entire reservoir floor.
The Components
- The Trench: First, excavate the trenches into the rough-graded subgrade.
- Geotextile Liner: Line the trench with a robust, non-woven filter geotextile. This fabric is the most important part of the system—it allows water to enter the drain but prevents fine soil particles (silt and sand) from migrating in and clogging the pipe over time.
- Clean Aggregate: Next, fill the trench with a layer of clean, free-draining gravel or crushed stone.
- Perforated Pipe: Lay the perforated drainage pipe on top of this aggregate bed.
- Final Backfill: Cover the pipe with more clean aggregate, then fold the geotextile liner over the top of the aggregate to completely encapsulate the entire drain system.
Once the geotextile is closed, the trenches can be backfilled with native soil, and you can proceed with the final grading and compaction of the entire subgrade surface.
Proof-Rolling and Compaction
After the trenches are backfilled, perform the final grading and compaction of the entire reservoir surface. This is where you bring in the heavy, smooth-drum roller for proof-rolling to ensure the whole area is uniformly firm and stable. This critical quality control step serves two purposes: it achieves uniform compaction and reveals any soft, unstable spots that “pump” or deflect under the roller’s weight. Mark these soft spots, dig them out, and replace them with properly compacted fill.
The Final Finish
After compaction, final grading is performed to create the finished surface. The standard you’re aiming for is easy to test: the subgrade should be firm and smooth enough to comfortably walk on in your socks. Once the site has passed the “sock test,” conduct a final, meticulous walk-through with your team to remove every last rock, stick, or piece of construction debris.
In areas with aggressive vegetation like nutgrass, you may also consider applying a soil sterilant according to the manufacturer’s directions to prevent future growth from pushing up against the liner.
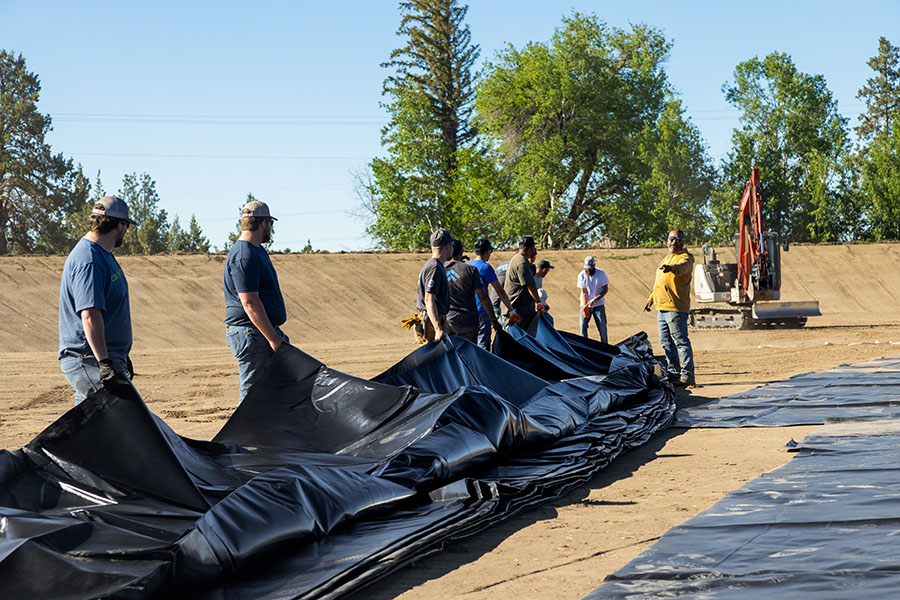
The Underlying Geosynthetic Layers
Once the subgrade is perfected, the final step of building the foundation is installing the layers that form a complete secondary containment and monitoring system. These layers provide redundancy and critical real-time data necessary for a high-performance PSH operation.
The Secondary Composite Liner
Placed directly over the prepared subgrade, the secondary liner system is a composite of two materials.
Geosynthetic Clay Liner (GCL)
The GCL provides a robust, self-healing hydraulic barrier.
Secondary Geomembrane
Lay a solid geomembrane liner (often HDPE or RPE) directly over the GCL. The membrane layer provides another continuous, impermeable barrier and supplies essential confinement pressure on the GCL. This is a key point, because the pressure allows the bentonite clay to achieve maximum swell and lowest possible permeability.
The Leak Detection and Collection System
This layer is the real high-tech feature. It’s positioned between the secondary geomembrane and the primary RPE geomembrane. It’s typically an engineered geonet or geocomposite. The plastic, mesh-like drainage core provides a high-flow channel that, in the case of a breach, will immediately collect leaking water and channel it to a sump for detection and removal.

